Sweet Rhubarb Upside-Down Cake.

rhubarb_cake

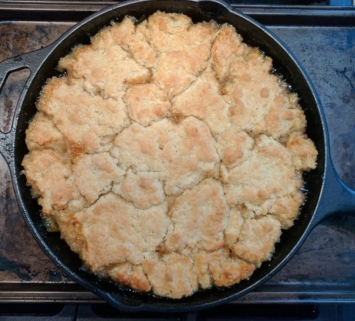
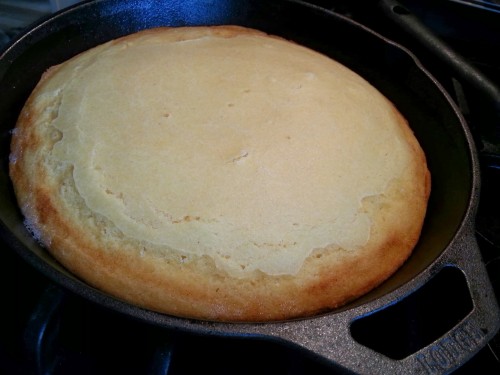
Fresh out of the oven.

I am not a huge fan of rhubarb, but I keep trying. Everyone else seems to like it – in muffins or crumbles or.. whatevers.  This recipe called to me, and I had exactly 1 pound of rhubarb in my fridge, so I made some quick changes and popped this into the oven.

I am now fully in love with rhubarb. Or, at least, this recipe. Be forewarned: it’s really sweet and really tart!

Sweet Rhubarb Upside-Down Cake.

Ingredients:

  • 1 1/2 cups sugar, divided
  • tablespoons unsalted butter (room temperature)
  • 1/2 cup of butter (1 stick) and 6 tablespoons butter, cold.
  • Zest of one lemon + save the juice (you need 1 tablespoon + 2 teaspoons)
  • teaspoons vanilla extract
  • 1/2 teaspoon salt, divided
  • 1 pound rhubarb, trimmed and cut into 1-inch pieces
  • 2 1/2 cups all-purpose flour
  • teaspoons baking powder
  • 1/3 cup whole milk
  • 2eggs, lightly beaten

Directions:

  1. Heat oven to 375° F.
  2. Heat a 10″ cast iron skillet over medium. Add in 1 cup of sugar, 4 tablespoons butter (room temp), lemon zest, lemon juice, vanilla, and 1/4 teaspoon of salt. Stir gently while things melt and get goopy.
  3. When the butter and sugar have melted together, add the rhubarb pieces and cook, stirring occasionally. The rhubarb will give off quite a bit of moisture – that’s okay! Cook until the rhubarb is tender (approx 6 to 8 minutes). Allow to simmer while you complete the next steps.
  4. In a small bowl, whisk together remaining sugar and salt, plus flour and baking powder in a bowl. Add the cold butter, and use your fingers to rub the flour and butter together to form coarse pea-size chunks.
  5. Add milk and eggs and stir until a soft, sticky dough forms.
  6. Turn off the heat underneath the skillet (it’s okay to leave the skillet on the burner, though).  Take pieces of dough and stretch them gently – and place over the hot rhubarb mixture. Try to cover the entire surface. It’s okay for dough chunks to overlap – it’s a bit like making rhubarb cobbler! I ended up using only about 2/3rds of the dough because I wanted a bit less cake – if you’d like a thicker cake, use the full amount.
  7. Put the skillet onto a baking sheet (just in case of overflow!) and put into the centre of the pre-heated oven.  Bake until the cake is golden – for a 2/3rds dough, this will be about 25 minutes. For the full dough recipe, expect between 30 and 35 minutes.
  8. Remove baking sheet and skillet from the oven and let the cake rest for about 10 minutes.
  9. Place a platter or plate on top of the skillet and invert quickly and carefully. The rhubarb will be gooey and sticky on top. Yay!
  10. Serve warm or at room temperature!

Skillet Pineapple Upside-Down Cake.

Oh yeah.

Oh yeah. 1970s-style goodness.

You will have to forgive the photo, above. It does not do justice to this cake. But I made this recipe rather late in the evening, just as the kids were heading to bed, and so the photo was taken close to 10pm after a very busy weekend. I am totally just phoning it in here, is what I’m saying, when it comes to this picture.

See, I had promised myself – and my husband – that I was going to make this cake during the holidays. And I was quickly running out of holidays in which to live up to my promise.  I’ve been craving it for weeks!

This is a really easy recipe to make and was really, really tasty when we finally got to eat some at 10:30-ish on Sunday night.

Skillet Pineapple Upside-Down Cake

Ingredients:

Topping:
6 tablespoons of unsalted butter
3/4 cup, packed, of light brown sugar
1 can of pineapple chunks, reserve the juice for the batter
as many little red maraschino cherries as you like

Cake batter:
1 1/2 cups of all purpose flour
2 teaspoons of baking powder
1/4 teaspoon of salt
6 tablespoons of unsalted butter, softened
1 cup of white sugar
2 large eggs
1 1/2 tablespoons of vanilla extract
1/2 cup of unsweetened pineapple juice (from above)

Directions:

  1. Preheat oven to 350F
  2. In a 10″ cast-iron pan, make the topping. Melt the butter over medium heat and add in the brown sugar.
  3. Cook for 4 minutes on medium, stirring constantly. The sugar and butter will turn into a thick caramel that will make you feel tingly just looking at it.
  4. After 4 minutes, remove the skillet from the heat. Arrange your pineapple chunks and cherries (if you’re using them) in a delightful pattern. I went with concentric circles. You can do whatever you want. Set aside to cool.
  5. In a small bowl, mix together the flour, baking powder, and salt.
  6. In a bigger bowl, cream the butter and sugar together – I used my stand mixer for this step.
  7. Add the eggs in, one at a time, mixing well after each one. Add the vanilla extract and mix again.
  8. Add half of the flour mixture, stir well.
  9. Add pineapple juice, stir well.
  10. Add the rest of the flour mixture and stir until it’s mixed. Don’t get crazy with this step.
  11. Gently pour/spoon/scrape the mixture out of the bowl and onto the carefully arranged pineapple (and cherries) in the cast iron pan.  Smooth it a bit if needed. Don’t worry much.
  12. Bake for 45 minutes – until the top is golden. Check it with a toothpick or a cake tester – it should come out clean.
  13. Cool in the pan for about 5 minutes, then invert onto a plate so everyone can see your beautiful pineapple arrangement. You might have to put a few pineapples or cherries back in place – use a fork because they are ridiculously hot and covered in melty sugar.
  14. Cool until room temperature-ish (if you can wait that long) and then serve! Yay!

Let’s Get Paleo.

Mighty tasty.

Mighty tasty.

If it hasn’t become wildly apparent, we don’t follow any particular eating plan around here. We eat meat and veggies. We eat breads and fruits. We’re not followers of low carb or paleo or .. whatever. If it’s food, chances are good one of us likes it.

I’m not afraid to check out recipes that are from a particular style of eating, though, especially if it sounds delicious and won’t require an investment in a huge number of ingredients that we won’t regularly use.

Over on Nom Nom Paleo, I found a recipe for Egg Foo Young-ish – it sounded like something my husband would like and the only ingredient we didn’t have on hand was the coconut flour. I picked that up at the grocery store.

I am not a fan of Egg Foo Young but these turned out to be SO GOOD!  I tweaked the recipe somewhat for our tastes and that’s what’s transcribed below. If I were in your shoes, I’d go check out the original recipe and see if it would work for you as-is.

Modified Egg Foo Young-ish

Ingredients:

4 large eggs
3/4 tablespoon dried minced chives
1 teaspoon dried onion powder
¼ cup coconut flour
½ teaspoon baking soda
1 cup frozen spinach, thawed and squeezed dry (you end up with about 1/3 cup of spinach)
2/3 cup diced ham (or any leftover cooked meat)
1/2 teaspoon of apple cider vinegar
1/2 teaspoon ground black pepper
coconut oil for frying

Directions:

  1. Whisk the eggs in a large bowl. Add in the minced chives and onion powder. Allow the chives to rehydrate.
  2. Stir in the coconut flour and baking soda. If you’ve never used coconut flour before, marvel at how rapidly is soaks up the eggs. Worry that you’ve ruined the recipe (you haven’t) and carry on anyway.
  3. Stir in the spinach, ham, vinegar, and black pepper.
  4. Heat the coconut oil over medium heat in a cast-iron pan (or on a griddle, if that’s what you’ve got).
  5. Divide the batter into 6 (I just used a spoon and shoved it around in the bowl a bit ’til it was divided a bit).
  6. Put one of those 6 blobs of batter into the pan. Press down gently to flatten – then cook for about 2 minutes. Flip and cook for another minute. The end result should be crispy on the outside!
  7. Cool ’til it reaches eating temperature.
  8. Repeat until you’ve used up all the batter.

Skillet Chocolate Chip Cookie.

Cooooookie.

Cooooookie.

Skillet Chocolate Chip Cookie

Makes a thick, chewy, 10″ cookie.

Ingredients:

1/2 cup butter, at room temperature
1/2 cup packed brown sugar
1/4 cup sugar
1 large egg
1 tsp vanilla extract
1 1/2 cups all-purpose flour
1 tsp baking soda
1/2 tsp salt
1 1/2 cups coffee/chocolate chips

Directions:

  1. Preheat the oven to 350F.
  2. In a stand mixer, cream together butter and sugars. Add egg and vanilla, mixing and scraping down the sides of the mixer.
  3. Add flour, baking soda, and salt – mix to combine.
  4. Add the chocolate chips and mix just until everything is neat and tidy together.
  5. Firmly press the dough into a 10″ cast iron skillet.
  6. Bake for  about 20 minutes (until golden and  set)
  7. Allow to cool slightly before slicing.

Notes:
I used coffee-flavoured chocolate chips – the local grocery store had them available just before Christmas, so I figured I’d try them. You can use whatever kind of chocolatey-chip-like thing you like best. Adapted from this recipe.

1 Hour Focaccia Bread.

SO GOOD.

SO GOOD.

When I bought my cast iron skillet, a friend sent me a bunch of links on Pinterest to various foods – made in cast iron skillets. This one intrigued me in no small part because the claim was that it could be made in an hour (or less) and because it’s bread. Also, I’m a fan of focaccia bread.

There’s one huge problem with this bread – it was gone, completely, within 10 minutes of coming out of the oven. And then we were sad. It’s soft, buttery, covered in melted parmesan cheese (or clumps of parmesan, if you’re like me and can’t quite brush things on evenly) and the bottom is lightly crispy.

It took a lot of self-control to not make another one right away.

1 Hour Skillet Focaccia Bread.

Makes one 10″ focaccia bread.

Ingredients

3/4 cup warm water (~100F)
1/2 tsp white sugar
1 1/2 tsp yeast
2 Tbsp olive oil
2 cups all-purpose flour
1/2 tsp salt
3 Tbsp unsalted butter, melted + extra for greasing the skillet
1 Tbsp grated parmesan
1/2 tsp Italian seasoning

Instructions:

  1. Pour warm water into the bowl of a stand mixer and add sugar. Stir to dissolve.
  2. Sprinkle the yeast over the water and stir gently to mix.  Wait for the yeast to foam – yay yeast!
  3. With the mixer on low, add 1 cup of flour and the 1/2 teaspoon of salt.
  4. When flour is incorporated, add the olive oil and continue to mix.
  5. Slowly add the remaining cup of flour – until the dough starts to pull away from the side of the bowl.

  6. Preheat the oven to 220 degrees F and when it’s ready turn it off (leave the door closed). If your oven has a proof setting, you can skip this step.
  7. Grease the skillet with a bit of butter.
  8. Dump the remaining flour onto your counter. Dump the dough onto that flour! Knead gently until the dough is smooth and not sticky.
  9. Roll the dough into a circle that’s about 10″ – the size of the skillet. Place the dough into the greased skillet and, using your fingers, stretch the dough upward on the sides.
  10. Cover the dough with a cloth and place into the warm oven (or in the oven with the ‘proof’ setting on).
  11. Wait 20 minutes.
  12. Take the skillet out of the oven and preheat the oven to 400 F.  Using your fingertips, jab the dough to make some dents (these will collect the butter and the cheese and the spices.. oh yeah.)
  13. In a small cup, mix the melted butter, parmesan, and Italian seasoning. Brush the dough with half the mixture.
  14. When the oven has reached 400F, put the skillet back in there and bake for 20 minutes (or until golden brown on top).
  15. After removing the bread from the oven, brush it with the rest of the butter mixture.
  16. Cool slightly, slice, and eat. (Good luck making this last more than 10 minutes.)

Notes:
You can easily mix the dough by hand – no need to use the food processor.  Just knead it!

Skillet Cornbread.

Buttery!

Buttery!

My husband loves cornbread. I don’t have any objections to it – it’s usually sweet and buttery, and I’m good with that – but I don’t seek it out or get excited by the idea of it.

Having recently acquired a 10″ cast iron skillet, I decided that my first recipe would be cornbread. It was easy to make, it turned out wonderfully, and I ate several pieces. More than my husband. Next time I’ll add some minced jalapenos!

Here’s the recipe:

Skillet Cornbread

Makes one lovely round 10″ loaf of cornbread (see notes)

1 1/4 cups ground cornmeal
3/4 cup flour
1/4 cup white sugar
1 teaspoon sea salt
2 teaspoons baking powder
1/2 teaspoon baking soda
1/3 cup whole milk
1 cup buttermilk
2 eggs, lightly beaten
1/4 cup of unsalted butter (melted)

Directions:

  1. Preheat the oven to 425F.  Put the cast iron skillet into the oven to heat while you’re preparing the batter.
  2. Mix the cornmeal, flour, sugar, salt, baking powder, and baking soda together. Stir in the milk, buttermilk, and eggs.
  3. Add almost all of the melted butter, stirring. Save about a tablespoon of melted butter for slickin’ up the skillet later!
  4. Remove the hot skillet from the oven and drop the oven temperature to 375F.
  5. Coat the bottom and sides of the skillet with the remaining melted butter. Use a basting brush to coat the sides.
  6. Pour the batter into the skillet and bake in the centre of the oven for about 17 minutes.  (See notes)
  7. The cornbread is done with the centre is firm and a toothpick comes out clean.
  8. Allow to cool slightly before serving.

Notes:
You could make this in a larger, or smaller, skillet – for a smaller skillet, add time. For a larger skillet, decrease time. Just keep an eye on it!

Swedish Pancakes.

Growing up, I often spent a weekend (or even a full week) sleeping over at my maternal grandmother’s house.  Her maiden name was Daisy Ida Marie Skoog. One of the highlights of staying over was waking up to find her heating up the pancake pan and using her hand mixer (it looked like this one, but with a black handle) to get the batter ready.

When Nana died, I inherited her pancake pan. I didn’t use it at all, however, because I wasn’t sure how to use it – so it went into a box with several other things that I treasure but don’t use/display.

This week I decided to dig it out, clean it up, reseason the cast iron, and make some good ol’ Swedish pancakes.

Here’s a photo of the cleaning up of the plett pan.

Plett, salt, and potato.

Plett pan, salt, and potato.

The basic idea is to sprinkle the cast iron with coarse salt and use a wedge of potato to scrub off rust, flaky bits, or anything stuck to it. I rinsed once, then repeated the process, and the pan came out beautifully. I then oiled it up with a fine coat of vegetable oil and put it in the oven for an hour at 300F to reseason the cast iron. Let it cool and TA DA! Reseasoned cast iron!

I have several children and making Swedish pancakes for a meal, for all of them, would have required me to start at 7 am and work all morning – so, instead, I made them as a snack.  I have my grandmother’s recipe but, recognizing that she didn’t bother to measure anything, I adjusted it slightly to bring it all closer to what I remember the texture, flavour, and appearance being when I was a kid.

Here’s a plate of Swedish pancakes with some homemade jam:

Little Pancakes!

Little Pancakes!

The first attempt was too dark, the second was too thick, and finally, finally, they turned out just right for the remaining 10-ish attempts. Lightly golden, slightly crisp at the edges, and sweet.  You could adapt these to be made in a regular pan (I realize that the plett pan is a bit of a random thing for most people). As a kid, I could eat an entire batch on my own.

Here’s the recipe:

Daisy Ida Marie Skoog’s Swedish Pancakes

Makes a lot of pancakes. No idea how many.

Ingredients:

3 eggs, beaten
2 cups of milk
1 1/4 cups of flour (see notes)
6 tablespoons of melted butter (see notes)

Directions:

  1. Combine all ingredients together. Mix well.
  2. Heat pan to medium (see notes). Brush lightly with a bit of butter.
  3. Spoon a small amount of batter into each section.
  4. Cook until puffed up (small bubbles form), flip the pancakes, cook until golden.

Notes:

  1. The original recipe called for just 1 cup of flour. The batter was so runny and didn’t cook well in the pan. I increased by about a quarter cup.
  2. I think I could have used less melted butter in the batter and, next time, I’ll decrease to 4 and see what happens.
  3. “Medium” for the pan was around a ‘4’ on my gas range. I don’t normally cook on cast iron pans, so it took a bit of adjusting for me to get a temperature that wasn’t ridiculously hot or too low. It should take about 2 minutes to cook a pancake – one minute per side, give or take a bit.

“Artisan” Bread.

Crusty, tasty bread.

Crusty, tasty bread.

Everybody loves this recipe because it really and truly is as easy as it looks. And everyone makes it and says, “I think I did it wrong..” because of the wet dough and the fact that it just seems WAY too easy for anyone who’s ever made bread before (or who has decided not to make bread because it seemed too difficult).

“Artisan” Crusty Bread
Makes one lovely loaf.
3 cups unbleached all purpose flour
1 3/4 teaspoons salt
1/2 teaspoon Instant or Rapid-rise yeast
1 1/2 cups water
Directions: 
  1. Combine flour, salt, and yeast into a large bowl.
  2. Add the water and mix (by hand) until everything is combined and rough looking.  The dough is very, very soft – you won’t need to put much effort into mixing this up.
  3. Put a lid on your bowl, or cover with plastic cling wrap. Set it aside for a minimum of 12 hours (and as many as 24). The dough blob will get much larger, look very bubbly and wet, and you’ll be concerned that you have done something wrong. Don’t panic.
  4. Heat the oven to 450F.  While the oven is preheating, place a cast iron Dutch oven (and lid) inside. Once the oven has reached 450, start timing for 30 minutes. (The Dutch oven is empty. No bread dough in there.)
  5. While the oven is heating, heavily flour your counter and dump the dough on top. It will be very sticky, wet, and goopy. You will again be concerned that you have done something wrong. Don’t panic.
  6. Shape the dough into a ball – not kneading, just sort of prodding it into shape –  and cover the ball with plastic wrap. Set aside until the 30 minutes of Dutch oven-heating are finished.
  7. When the oven has heated, and the Dutch oven has been inside for 30 minutes, pull out the Dutch oven and plunk the dough into it. You can use a layer of parchment paper if you like (I did) to make it easier to transfer the dough from the counter into the really, really hot Dutch oven.
  8. Put the lid on the Dutch oven and put it back into the oven for 30 minutes.
  9. After 30 minutes,  remove the lid.. and bake an additional 15 minutes.
  10. Remove bread from oven, pull it out of the Dutch oven, and place on a cooling rack to cool.
  11. Cool fully before slicing. Enjoy the crackling noises!

Updated to add:
You can make this in a Dutch oven that’s as small at 3 quarts, apparently. I used a 6 quart and the loaf sat in the middle and didn’t get anywhere close to the sides. All good!  You can also make it in any oven-safe pot with a lid, according to the internet.