Our BBQ has been on its last legs for a while now. Parts started disintegrating, rusting, or just falling off altogether. My husband replaced some of them and some parts we couldn’t find a match with which to replace.
I did a little informal poll on Facebook to ask how long people’s grills normally last – the range was pretty much 5-8 years with a few outliers on either side (3 years and 14 years). Ours had lasted about 7 years.
My friend Lena suggested that I look into a Big Green Egg. I did, and discovered that it was totally out of my price range once we factored in the various accessories we’d want for it. From there, however, I learnt about kamados and, from there, I discovered Kamado Joes. After a bit of research, we hopped in the car and picked one of the Classics up. I will spare you the big sales pitch, but I think they’re a good deal.
The first thing cooked on the new grill was.. frozen burgers. Easy, inexpensive, and I wouldn’t be heartbroken if they didn’t turn out beautifully – but they turned out well and we happily ate them.
Today I smoked pork ribs – a much, much, much longer process. But oh, man, the results were fantastic (if I do say so myself). I love to eat meat – but I am generally not fond of cooking it (because I’m always convinced that I’m going to kill everyone by undercooking it, so I compensate by burning the shit out of it).
But these ribs.. my goddess, they were heavenly. Just amazing.
The ribs that I bought were labelled “pork ribs” which, after some online research, I determined were St Louis cut. This was good because it meant that I didn’t have to do much clean-up on them to get them ready.
First, I took the ribs and removed the excess fat and the weird membrane. Then I brushed the ribs all over with a very light coating of cheap-o yellow mustard.
I whipped up a batch of this dry rub and coated the mustardy ribs in the rub. They then looked like this:

Dry rub on!
I left them to sit while I started up the Kamado Joe. I’m still learning (obviously) how to regulate the temperature, but I knew that I needed to do them “low and slow” – though various recipes called from temperatures ranging from 225 to 275. I went with 250F to keep it simple.
The 3-2-1 method that I found here seemed easy enough for me to follow – nothing complicated.
So, I tossed the ribs onto the pre-heated grill and set the timer for 3 hours… only to discover that I could not keep the temperature of the grill from going up and up and up. It didn’t help that the wireless digital thermometer I was using kept crapping out on me (and telling me that the temperature in the grill was about 40 degrees higher than what the thermometer on my grill said!)
I spent a lot of time running in and out of the house.
At the end of the 3 hours, however, things looked pretty good:
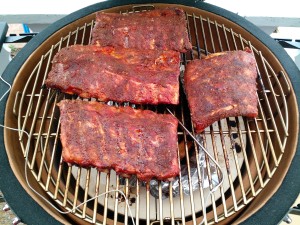
3 hours down, 3 to go?
I took each chunk of ribs off of the grill and coated both sides liberally in honey and brown sugar (mmmm!) before wrapping them into little packages. No photo of this, sadly. While wrapping, I noted that the ribs looked more ‘done’ than I would have expected, so I decided to adjust the cooking time slightly.
I put the packets of meat back on the grill and set my timer for 40 minutes (instead of 2 hours). When the timer went off, I checked the internal temperature of the meat and found it was already at 190F. Eeep!
I unwrapped the meat, brushed both sides with a 50/50 mix of BBQ sauce and honey, and put them back on the grill for a total of 30 minutes (flipping them once after 10 minutes).
The 3-2-1 method became the 3-1-.5 method!
To be honest, I was pretty convinced that they would be overcooked – possibly dried out – given how dark the outside of the meat was. I was mentally making adjustments in my head, checking out some info on the Kamado Guru forums, and plotting how I’d do all of this differently for the next batch.
But when we sat down to eat… oh, holy heck, they were amazing. And not just the amazing that comes from spending 5 hours cooking something, either.
The outside was crispy and had some chewiness to it (from the honey/brown sugar) and there was a hint of a smoke ring on the inside, and the meat just fell off of the bone as we ate it.
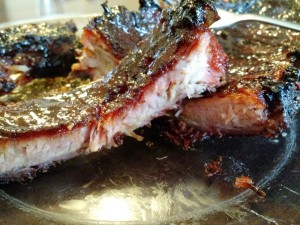
So good. So very good.
It took 5 hours to make and about 10 minutes to eat them all. Totally worth it.
Next time I’m going to work on keeping my temperature a lot lower – I need to get used to the air flow and the vents and how they work together – but I would not be the slightest bit sad if the next batch turned out exactly like these did.
I’m so glad that I’ve got another package of ribs waiting in the fridge for next time.