Tuna Noodle Casserole

I am on a quest to use up the ungodly amount of food in my pantry (actually, I have several) and freezer. I have adapted somewhat to buying/cooking for just one person old habits die hard and sometimes I buy a 3-pack of something where I really only needed a single item.

Anyway. Welcome to my childhood in the 70s.

Makes: 6-8 servings depending how hungry you are

Ingredients:
1 pkg (340 grams) of broad egg noodles
2 cans of condensed cream soup (your choice – mushroom is standard)
a few cups of frozen peas (I use a LOT)
400 grams shredded old cheddar cheese
2 cans of flaked tuna in water (not oil) OR a whatever protein you like (chicken, ham, etc.)
2 tablespoons of Italian seasoning
Pepper to taste

Directions:

  1. Preheat oven to 350F.
  2. Cook the noodles until they’re nearly done. Toss in the frozen peas and stir around until the peas are thawed.
  3. Drain the noodles and the peas. Dump everything into a very large bowl.
  4. Open the tuna (or turkey, chicken, ham) or chop up some cooked chicken/turkey, and throw it into the bowl with the noodles.
  5. Open the 2 cans of soup and throw them into the bowl too.
  6. Add in about 3/4 of the shredded cheese (the rest will go on top of the casserole while it bakes).
  7. Add in about 1.5 tablespoons of Italian seasoning (the rest will go on top of the casserole).
  8. Add in some black pepper if you like it.
  9. Mix everything together very well. Put it all into a casserole dish. I don’t butter mine, but you can if you want. Totally up to you.
  10. Top with the remaining cheese and Italian seasoning.
  11. Put the casserole, uncovered, into the oven. Bake for about 20 minutes – until the cheese is melted, everything is hot, and you can’t possibly wait any longer because you’re very, very hungry.
  12. Leftovers are delicious reheated in the microwave.

Notes:
I recently made this with 1 can of tuna and about 3/4 cup of diced, precooked, seasoned chicken breast that I had left over. It was spectacular.


Instant Pot Mac n’ Cheez

No photo at the moment (I’ll update next time I make the recipe, though). Whenever a friend buys an Instant Pot, this is the recipe that I suggest they try first – it’s easy, has minimal ingredients, and always turns out perfectly.

Makes: approximately 6 servings, depending on what you consider a reasonable amount of pasta to eat.

Ingredients:

  • 1 pound elbow macaroni
  • 2 tablespoons butter
  • 1 tablespoon yellow mustard
  • 1 teaspoon hot pepper sauce
  • 2 teaspoons salt
  • 4 cups water
  • 1 can evaporated milk (plus extra milk if you want it creamier)
  • 2 cups (or more) shredded cheddar cheese (or marble)
  • Parmesan if you like it

Directions:

  1. Add macaroni, butter, mustard, hot sauce, salt, and water into the instant pot. Stir well.
  2. Secure the lid on IP and make sure the valve on top is set to “pressure”. Hit the “manual” button, then set to 4 minutes. Release the valve (“quick release”) when finished.
  3. Leave it on “keep warm” and stir in cheese and milk(s), alternating, until you reach the consistency you prefer – saucy, gooey, whatever!
  4. Eat the mac and cheez.

Optional:

  • Add black pepper, garlic powder, Italian seasoning, or other random spices to the water in the pot before cooking.
  • After cooking, add in pre-cooked bacon, or other meat (chicken, turkey, etc), for additional protein.
  • After cooking, transfer to a casserole dish, top with bread crumbs and cheese, and briefly broil in the oven for a crunchy top.

Calzone.

Okay, they look terrible. The lighting was garbage, I didn’t weigh out the dough, etc., etc. I always forget how fast and easy these are to make – and also how much I enjoy eating them. Maybe someday I’ll take a good picture and swap it out for what’s up there.

Makes: 4 calzone

Ingredients:

1 pound of pizza dough (I usually just buy the frozen ball from the grocery store)
1 tablespoon of olive oil, some melted butter, or my favourite: Garlic King garlic spread
1.5 tablespoons Italian seasoning (if you like it)
Maybe some coarse salt to sprinkle?
A bunch of whatever filling(s) you want – cheese, pepperoni, vegetables, tomato sauce, pulled pork.. literally whatever you want. See below for my favourite.

For my favourite filling:
1 cup ricotta cheese, drained as much as possible
1/2 cup grated cheese (any kind you like)
1/4 cup cheap-ass parmesan cheese
A bunch of black pepper
Maybe some garlic powder?

Instructions:

  1. Thaw the dough overnight in the fridge (if-needed) and then leave it on the counter for about an hour to rise a bit.
  2. Preheat the oven to 425F.
  3. Line baking sheet with parchment or silicone mat.
  4. Divide the dough into 4 equal balls – or just guess at it. Use your hands (or a rolling pin, I guess?) to flatten them into oval shapes.
  5. Add equal amount of topping to the bottom half of the oval. Make sure to leave room around the edge so you can crimp the dough together on step 7.
  6. Fold the top part of the oval over so you now have a semi-circle containing the filling.
  7. Pinch the edges tightly to seal them. Put the calzone onto the baking sheet.
  8. Brush the top of the calzone with oil, butter, or garlic spread. Sprinkle with Italian seasoning if you’re using it. Throw on some coarse salt if you like it.
  9. Using a sharp knife, cut a 2cm-ish slit into the top of each calzone.
  10. Bake for 15 minutes, rotate the pan, bake for another 2-5 (depending how dark you want your calzone to be toasted).
  11. Allow it to sit for a while because, holy shit, the filling is lava.
  12. These reheat just fine in the microwave or air fryer, depending on what you’ve got.

Instant Pot Paella + Risotto Hybrid

This recipe needs.. more. Next time I will add in some diced peppers, at the very least, and maybe some celery? That said, it was quick and easy to make – just not as flavourful as it could have been.

Ingredients:

1 tablespoon olive oil
1 cup / 8 oz chorizo sausage (or other cooked sausage), sliced 1/4 inch thick
2 teaspoons salt
1 1/2 teaspoons smoked paprika
1 1/2 cups arborio rice
2 tablespoons tomato paste
4 cups vegetable broth
1 cup frozen peas

+ additional veg like diced red pepper and maybe some celery

Directions:

  1. Hit the saute button the instant pot. Heat up the olive oil. When it’s hot, add the chorizo and stir/cook until slightly crispy. Transfer the chorizo to a bowl, but leave the oil in the pot.
  2. Add the onion, 1/4 teaspoon of salt, and saute until the onion is soft. (Add in the additional vegetables here, but not the frozen peas). Add smoked paprika, keep cooking. Add the rice, stirring frequently so it doesn’t burn, until it is translucent (this takes a few minutes). Add the tomato paste, keep stirring for another minute or two.
  3. Add the broth, and the rest of the salt. Stir well, scraping the bottom of the pot. Hit cancel on the instant pot.
  4. Put the lid on the pot and set to cook on high for 6 minutes.
  5. When it’s done cooking, quick release it.
  6. Stir for a few minutes to thicken up the rice/sauce. Add in the peas.

Slightly Spicy Singapore Fried Vermicelli

I am trying to eat more vegetables and I am trying to cook more often. This recipe turned out SO GOOD that I ate two servings and, if I had any room left in my stomach, I would have eaten an additional two. Absolutely satisfied my craving for take-out noodles and veg.

Makes 4 to 6 servings, depending how hungry you are….

Ingredients:

5 cloves of garlic (or more)
5 oz mushrooms (your choice)
5 green onions
1 fresh red Thai chili (or more, if you like heat)
1 large bunch of broccolini
2 baby bok choy (or 1 regular bok choy) – about 3.5 oz
1 large carrot
1 red bell pepper
8oz dried rice vermicelli
1/4 cup vegetable oil
4 1/2 tablespoons soy sauce (I used Braggs)
2 teaspoons curry powder (I used mild)
1 1/2 tablespoons white sugar
2 tablespoons water
salt, pepper to taste
1 lime, or the equivalent in juice

Instructions:

  1. Peel and dice/grate the garlic. Thinly slice the mushrooms. Chop up the red chili, removing the seeds if you don’t want much spice. Put all of this in a small bowl.
  2. Chop the brocolini into 3/4 inch pieces. Slice the green onions (including the green parts). Trim the bok choy, separate all the leaves, and, if needed, slice any exceedingly large leaves in half. Peel the carrot, then use the same peeler to make long, thin ribbons of carrot. Cut the bell pepper into thin strips. This can all go into one medium bowl.
  3. Mix soy sauce, sugar, and curry powder in a small bowl. Set aside.
  4. Prepare the vermicelli noodles according to the package. Drain, rinse with cold water, drain again, and set aside.
  5. Put a wok onto high heat and add 1/4 cup of oil. When wok is really hot, add in the garlic, mushrooms and red chili. Stir fry for about 30 seconds to a minute.
  6. Add the rest of the vegetables into the wok. Stir a few times, then add in the soy/sugar/curry powder sauce. Stir fry for about 3 minutes.
  7. Add the noodles. Add a few tablespoons of water. Stir everything around, coating the noodles in the sauce.
  8. Season with salt and pepper + the juice of one lime. Add more chopped chili peppers as a garnish if you want additional heat.

Vegan Pad Thai

I made this and was feeling a bit ‘meh’ about it until the next day. I reheated some leftovers and it had improved significantly. I can’t explain it. I’ll make this recipe again (and again, and again..) and see if it needs something tweaked, but it’s possible this is just one of those things I’ll make and not eat immediately. Pad Thai is one of my favourite foods of all time, so having a few servings in the fridge for a quick lunch is absolutely a-okay with me.

Makes 4 large servings.

Ingredients:

1/4 block of extra-firm tofu (or more, if you really like it)
1 tablespoon cornstarch
1/4 cup vegetable oil
9 ounces of dried rice noodles (wide and flat, ideally)
1/2 yellow onion
5 cloves of garlic (more or less, depending on your preferences)
1 fresh Thai red chili
1 large carrot
3 1/2 ounces of bean sprouts
1/2 of a lime (or the equivalent in juice)
1/4 cup soy sauce or Braggs (I did half-and-half)

Sauce:
1 tablespoon sugar (white, brown, palm, whatever you prefer)
2 tablespoons tamarind paste
1 tablespoon Thai sweet chili sauce
Water

Garnish:
2 green onions
Lime wedges
Chili flakes
Chopped peanuts (about 1/2 cup)
Thai sweet chili sauce
Sriracha sauce

Instructions:

  1. Press the tofu for at least 30 minutes to remove as much liquid as possible. (Use 2 plates + a clean kitchen towel – wrap the tofu in the towel, put between the 2 plates, and put a weight on top.)
  2. Mix the ingredients for the sauce in a small bowl and set aside.
  3. Peel and chop the garlic and onion. Remove the stem from the chili and chop it up – remove all of the seeds if you don’t want some kick to your food.
  4. Peel the carrot and julienne it (or cut into match stick-sized slices).
  5. Cook the rice noodles according to the package – possibly a bit shorter of a time so they stay a bit firm (they’re going to be stir-fried to finish cooking them). Rinse, drain, and set aside.
  6. When tofu is pressed, chop into 1 inch cubes. Put them in a small ziploc bag, add the cornstarch, gently shake to coat.
  7. Heat wok over high heat and add 2 tablespoons of oil. Add the tofu and immediately drop the temperature to medium. Gently stir the tofu until all sides of cubes are browned. Remove to a plate.
  8. Bump the heat back up to high, add 2 more tablespoons of oil. Cook the garlic, onion, and chili pepper for about 2 minutes, stirring frequently. Add the carrot and keep cooking for another 2 minutes.
  9. Add the noodles, sauce, and continue stirring – add water as-needed to keep things from drying out or sticking, but not enough to make it soupy.
  10. When the vegetables are tender, add the tofu back into the wok. Add the bean sprouts. Add the juice from 1/2 of a lime (or the equivalent). Add soy sauce.
  11. When vegetables are slightly soft, remove wok from heat. Add more soy sauce or chili sauce, depending on your taste preferences.
  12. Slice the green onion into long strips. Chop up the peanuts. Cut limes into chunks for garnish.
  13. Divide the pad Thai into 4 bowls and garnish with green onions, peanuts, lime wedges. Serve with chili sauce and/or sriracha if you like.

Best Banana Cake (With Brown Butter Frosting)

This is not a fancy-looking cake, it is a delicious cake. I can’t remember where I found the recipe originally, but it very quickly took over my banana bread‘s place in the recipe ranking. It’s somewhat dense, the frosting is ridiculously good, and the entire thing comes together pretty quickly.

Ingredients:

Cake:

1 1/2 cups white sugar
1 cup sour cream (I like to use 5% fat, minimum)
1/2 cup butter, room temp
2 eggs
1 3/4 cup mashed super-ripe bananas (3-6, depending on size)
2 teaspoons vanilla extract
2 cups white flour
1 teaspoon baking soda
3/4 teaspoon salt

Frosting:

1/2 cup butter
4 cups icing sugar
1 1/2 teaspoons vanilla extract
3 tablespoons milk

Instructions:

  1. Preheat oven to 375F. Butter and flour a 9×13″ pan, set aside.
  2. In a large bowl, cream the butter and sugar together. Add sour cream and eggs, mix until creamy. Add bananas and vanilla, mix well.
  3. In a small bowl, combine flour, baking soda, and salt. Add to wet mixture and blend for at least one minute.
  4. Spread batter evenly into the pan. Bake 20 to 25 minutes (until golden brown, and/or until a cake tester comes out clean).
  5. Remove from oven and set aside to cool. When the cake is nearly cool, make the frosting (it spreads onto a warm cake easier than on cold, but don’t panic if you let it sit too long.)
  6. Heat butter in a large saucepan over medium heat. Bring to a boil, stirring or whisking frequently, until the butter turns a delicate brown. Remove from heat immediately.
  7. Add icing sugar, vanilla extract, and milk. Whisk together until everything is smooth – add more milk if-needed. It should be much thicker than a glaze but a bit thinner than frosting (it will firm up on the cake as it cools).
  8. Spread the frosting over the warm cake. Allow to rest until the frosting has firmed up. Eat!

Blueberries & Cream Bundt Cake

Tiered Bundt Cake

One of my kids bought me this bundt cake pan – it has been on my amazon wishlist for a long time, waiting for a sale, because it is so pretty and also Nordic Ware is expensive and no one really needs bundt pans. Anyway, since it was a Solstice gift, I was not prepared for it and there was no way I was going to the grocery store to buy ingredients during the holiday season, so I had to make do with what I already had in my pantry. Luckily, I tend to be well-stocked for baking.

This was a new recipe for me. It turned out very well, and I enjoyed it (as did the people with whom I shared some) but it was a smidge challenging to swirl the cinnamon and brown sugar in the tiered pan. Tiered Bundt Cake!

Easy recipe, I didn’t change much from the original.

Blueberries & Cream Bundt Cake

Ingredients

  • 1 cup salted butter, softened
  • 2 cups white sugar
  • 2 large eggs, room temperature
  • 1.5 teaspoons vanilla extract
  • 1-3/4 cups all-purpose flour
  • 1 teaspoon baking powder
  • 1/4 teaspoon salt
  • 1 cup sour cream
  • 1 cup fresh or frozen unsweetened blueberries
  • 1/2 cup packed brown sugar
  • 2 teaspoons ground cinnamon

Directions

  1. Preheat oven to 350°F. Coat a 12 cup bundt pan with butter, flour it lightly.
  2. In the bowl of a mixer, cream butter and sugar until light and fluffy. Add room temperature eggs and beat well. Beat in vanilla. In a separate bowl, whisk together the flour, baking powder and salt; gradually add to the butter and sugar mixture, alternating with sour cream. When fully mixed, stir in the blueberries (if they are frozen, that’s okay; no need to thaw them).
  3. Butter and flour the bundt pan. Spoon about half of the batter the pan.
  4. In a small bowl, combine the brown sugar and cinnamon. Sprinkle half over the batter. Top with remaining batter and then sprinkle the top with the remaining brown sugar mixture.
  5. Cut through batter with a knife to swirl the brown sugar mixture. Try to get down to the bottom.
  6. Bake until a toothpick or cake tester inserted near the centre comes out clean. This took me about 65 minutes, but the original recipe suggested 55-60 minutes.
  7. Cool for 10 minutes before removing from pan to a wire rack to cool completely.
  8. Optional: dust with icing sugar after it has fully cooled.

Sweet Rhubarb Upside-Down Cake.

rhubarb_cake

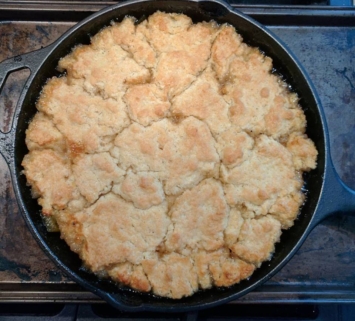
Fresh out of the oven.

I am not a huge fan of rhubarb, but I keep trying. Everyone else seems to like it – in muffins or crumbles or.. whatevers.  This recipe called to me, and I had exactly 1 pound of rhubarb in my fridge, so I made some quick changes and popped this into the oven.

I am now fully in love with rhubarb. Or, at least, this recipe. Be forewarned: it’s really sweet and really tart!

Sweet Rhubarb Upside-Down Cake.

Ingredients:

  • 1 1/2 cups sugar, divided
  • tablespoons unsalted butter (room temperature)
  • 1/2 cup of butter (1 stick) and 6 tablespoons butter, cold.
  • Zest of one lemon + save the juice (you need 1 tablespoon + 2 teaspoons)
  • teaspoons vanilla extract
  • 1/2 teaspoon salt, divided
  • 1 pound rhubarb, trimmed and cut into 1-inch pieces
  • 2 1/2 cups all-purpose flour
  • teaspoons baking powder
  • 1/3 cup whole milk
  • 2eggs, lightly beaten

Directions:

  1. Heat oven to 375° F.
  2. Heat a 10″ cast iron skillet over medium. Add in 1 cup of sugar, 4 tablespoons butter (room temp), lemon zest, lemon juice, vanilla, and 1/4 teaspoon of salt. Stir gently while things melt and get goopy.
  3. When the butter and sugar have melted together, add the rhubarb pieces and cook, stirring occasionally. The rhubarb will give off quite a bit of moisture – that’s okay! Cook until the rhubarb is tender (approx 6 to 8 minutes). Allow to simmer while you complete the next steps.
  4. In a small bowl, whisk together remaining sugar and salt, plus flour and baking powder in a bowl. Add the cold butter, and use your fingers to rub the flour and butter together to form coarse pea-size chunks.
  5. Add milk and eggs and stir until a soft, sticky dough forms.
  6. Turn off the heat underneath the skillet (it’s okay to leave the skillet on the burner, though).  Take pieces of dough and stretch them gently – and place over the hot rhubarb mixture. Try to cover the entire surface. It’s okay for dough chunks to overlap – it’s a bit like making rhubarb cobbler! I ended up using only about 2/3rds of the dough because I wanted a bit less cake – if you’d like a thicker cake, use the full amount.
  7. Put the skillet onto a baking sheet (just in case of overflow!) and put into the centre of the pre-heated oven.  Bake until the cake is golden – for a 2/3rds dough, this will be about 25 minutes. For the full dough recipe, expect between 30 and 35 minutes.
  8. Remove baking sheet and skillet from the oven and let the cake rest for about 10 minutes.
  9. Place a platter or plate on top of the skillet and invert quickly and carefully. The rhubarb will be gooey and sticky on top. Yay!
  10. Serve warm or at room temperature!

Instant Pot Meatloaf.

meatloaf_sliced.jpg

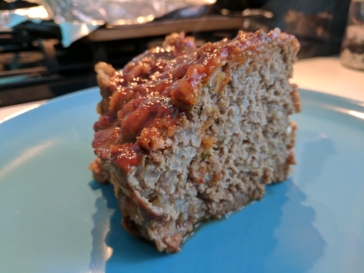
A delicious slice of meatloaf.

During the summer months, my husband will do almost anything to avoid using the oven  (or the stove, actually). Generally this works out in my favour, since he’ll happily head out to the deck and BBQ up some dinner for all of us.  But after picking up my Instant Pots and realizing that they contained heat very well, I started thinking about how easy it would be to cook ‘oven’ foods without heating up the entire house.

Like meatloaf.

Now, there are some challenges with cooking meatloaf in the Instant Pot. First, the very fact that it’s being pressure cooked means there’s no browning of the meat. Second, the glaze won’t get all glaze-y without the oven.  Are these important things? I decided to give it a shot while I was on vacation this week and see what happened.

I used my favourite meatloaf recipe: Thai Turkey Meatloaf from Budget Bytes. (Seriously, it’s the best meatloaf I’ve ever eaten.)  I stuck to the recipe without making any changes to the ingredients – but I did, obviously, make changes to the cooking process.

I have to say – I would happily feed this to my family (it was DELICIOUS) but I’d hesitate to serve it to guests because it really, really doesn’t look great.

Anyway, if you’re feeling like you want to experiment, here’s what I did:

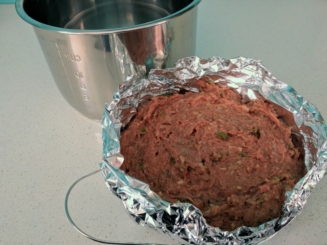
  1. After mixing all the ingredients together, use thick tinfoil to create a ‘pan’ for the meatloaf to sit in while cooking. I made mine round (like the inner IP pot) and about 4 inches tall on the sides.
  2. Put the meatloaf into the ‘pan’ you made and set it on top of the trivet.  Use tinfoil to make a sling, if you need to, unless your trivet has tall enough handles that you can easily pull it out after cooking. (The trivet that comes with the IP is too short to easily grab – so I add a handle onto it with the foil. There are many creative ways to get stuff out of the IP!)

    meatloaf_in-pan

    Homemade ‘pan’ with raw meatloaf in it!

  3. Add 2 cups of water to the bottom of the IP. Place the trivet in, along with the ‘pan’ of meatloaf.
  4. Put the lid on the IP, set it to ‘sealing’, and set it to ‘manual’ for 20 minutes. When the timer finishes, allow for 10 minutes of NR and then QR the remaining pressure.
  5. Check the internal temp of the meatloaf – it should be 165F for ground turkey. If it’s finished, great! If not, put it back into the IP, seal the lid, and do another 5-ish minutes of cooking. QR this time and re-check the internal temp of the meat.
  6. Take the meatloaf out and marvel at how doughy, grey, and unappetizing it looks. This is what happens when you pressure cook meat!
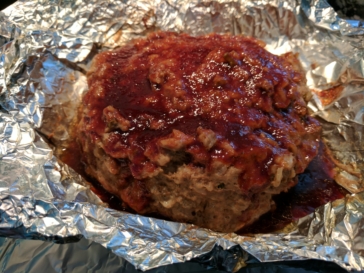
  7. Put the meatloaf onto a baking sheet, cover it in glaze, and put it under the broiler until things are looking better – the glaze should bubble and get sticky, the meat should brown a bit.  This can take anywhere from 5 to 10 minutes, but keep a close eye on it so it doesn’t burn.

    meatloaf_done

    Seriously, this doesn’t look appealing to me.

  8. Remove from the oven, slice it like a cake (?) and serve!  It’s absolutely delicious despite appearances – and the kitchen barely got warm in the process of making it. Win-win!