Instant Pot Meatloaf.

meatloaf_sliced.jpg

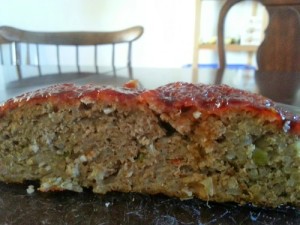
A delicious slice of meatloaf.

During the summer months, my husband will do almost anything to avoid using the oven  (or the stove, actually). Generally this works out in my favour, since he’ll happily head out to the deck and BBQ up some dinner for all of us.  But after picking up my Instant Pots and realizing that they contained heat very well, I started thinking about how easy it would be to cook ‘oven’ foods without heating up the entire house.

Like meatloaf.

Now, there are some challenges with cooking meatloaf in the Instant Pot. First, the very fact that it’s being pressure cooked means there’s no browning of the meat. Second, the glaze won’t get all glaze-y without the oven.  Are these important things? I decided to give it a shot while I was on vacation this week and see what happened.

I used my favourite meatloaf recipe: Thai Turkey Meatloaf from Budget Bytes. (Seriously, it’s the best meatloaf I’ve ever eaten.)  I stuck to the recipe without making any changes to the ingredients – but I did, obviously, make changes to the cooking process.

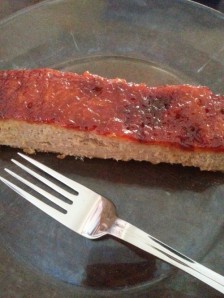
I have to say – I would happily feed this to my family (it was DELICIOUS) but I’d hesitate to serve it to guests because it really, really doesn’t look great.

Anyway, if you’re feeling like you want to experiment, here’s what I did:

  1. After mixing all the ingredients together, use thick tinfoil to create a ‘pan’ for the meatloaf to sit in while cooking. I made mine round (like the inner IP pot) and about 4 inches tall on the sides.
  2. Put the meatloaf into the ‘pan’ you made and set it on top of the trivet.  Use tinfoil to make a sling, if you need to, unless your trivet has tall enough handles that you can easily pull it out after cooking. (The trivet that comes with the IP is too short to easily grab – so I add a handle onto it with the foil. There are many creative ways to get stuff out of the IP!)

    meatloaf_in-pan

    Homemade ‘pan’ with raw meatloaf in it!

  3. Add 2 cups of water to the bottom of the IP. Place the trivet in, along with the ‘pan’ of meatloaf.
  4. Put the lid on the IP, set it to ‘sealing’, and set it to ‘manual’ for 20 minutes. When the timer finishes, allow for 10 minutes of NR and then QR the remaining pressure.
  5. Check the internal temp of the meatloaf – it should be 165F for ground turkey. If it’s finished, great! If not, put it back into the IP, seal the lid, and do another 5-ish minutes of cooking. QR this time and re-check the internal temp of the meat.
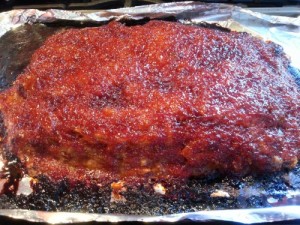
  6. Take the meatloaf out and marvel at how doughy, grey, and unappetizing it looks. This is what happens when you pressure cook meat!
  7. Put the meatloaf onto a baking sheet, cover it in glaze, and put it under the broiler until things are looking better – the glaze should bubble and get sticky, the meat should brown a bit.  This can take anywhere from 5 to 10 minutes, but keep a close eye on it so it doesn’t burn.

    meatloaf_done

    Seriously, this doesn’t look appealing to me.

  8. Remove from the oven, slice it like a cake (?) and serve!  It’s absolutely delicious despite appearances – and the kitchen barely got warm in the process of making it. Win-win!


Instant Pot Butter Chicken.

butter_chicken.jpg

Butter Chicken!

It’s challenging to take a decent photo of something like Butter Chicken – it’s just sort of.. saucy. But this was definitely a delicious dinner and it turned out even better than I had hoped.  Easy-peasy, too.

I’m not going to include a recipe for rice here – I used jasmine rice and I made it in my 2nd Instant Pot. You could easily use leftover rice (the sauce from the Butter Chicken will help warm it up!) or you could make it on your stovetop – – or in your second Instant Pot, if you have one.

Here’s the recipe:

Butter Chicken

Ingredients:

  • About 3 pounds of boneless skinless chicken thighs
  • 1 can (28 oz) diced tomatoes in juice
  • 1 jalapeno pepper, seeded
  • 1 inch fresh ginger, grated
  • 3/4 cup butter
  • 2 1/2 teaspoons ground cumin
  • 1 1/2 tablespoon paprika
  • 2 1/2 teaspoons kosher salt
  • 1 cup heavy cream
  • 1 cup plan Greek yogurt
  • 2 1/2 teaspoons garam masala
  • 3 tablespoons cornstarch

Directions:

  1. Cut chicken into bite sized pieces. Discard any excess fat.
  2. Into your blender, add the can of tomatoes (including the juice), the grated ginger, and the jalapeno. Blend until there are no chunks remaining.
  3. Add butter to your Instant Pot and use the saute function to melt it thoroughly.
  4. Add chicken in small batches (2 or 3 batches). Brown lightly on all sides. Use a slotted spoon to remove each batch and place into a bowl. You want to save any juices that come from the sauteed chicken.
  5. When you’re finished lightly browning the chicken, and all has been removed, add the cumin and paprika to the butter that remains in the pot. Stir well, until all spices are mixed into the butter. (Act fast, or it will burn!)
  6. Add in the tomato mixture, salt, cream, and yogurt. Stir quickly, then add the chicken and any drippings from the bowl. Stir again.
  7. Close the lid and set to manual pressure for 5 minutes.
  8. When the timer goes off, allow it to natural release for 10 minutes. After 10 minutes, do a quick release of any remaining pressure.
  9. In a small bowl, combine about 4 Tablespoons of water with the cornstarch. Mix really well.
  10. Stir the cornstarch into the pot. Add the garam masala.
  11. Using the saute button, bring everything to a boil and allow the curry to thicken to your liking. Add any salt, pepper, or other spices that your heart desires.
  12. Serve over rice. Nom.

Smoked Pork Ribs on the Kamado Joe.

Our BBQ has been on its last legs for a while now. Parts started disintegrating, rusting, or just falling off altogether. My husband replaced some of them and some parts we couldn’t find a match with which to replace.

I did a little informal poll on Facebook to ask how long people’s grills normally last – the range was pretty much 5-8 years with a few outliers on either side (3 years and 14 years). Ours had lasted about 7 years.

My friend Lena suggested that I look into a Big Green Egg. I did, and discovered that it was totally out of my price range once we factored in the various accessories we’d want for it. From there, however, I learnt about kamados and, from there, I discovered Kamado Joes. After a bit of research, we hopped in the car and picked one of the Classics up. I will spare you the big sales pitch, but I think they’re a good deal.

The first thing cooked on the new grill was.. frozen burgers. Easy, inexpensive, and I wouldn’t be heartbroken if they didn’t turn out beautifully – but they turned out well and we happily ate them.

Today I smoked pork ribs – a much, much, much longer process. But oh, man, the results were fantastic (if I do say so myself). I love to eat meat – but I am generally not fond of cooking it (because I’m always convinced that I’m going to kill everyone by undercooking it, so I compensate by burning the shit out of it).

But these ribs.. my goddess, they were heavenly. Just amazing.

The ribs that I bought were labelled “pork ribs” which, after some online research, I determined were St Louis cut. This was good because it meant that I didn’t have to do much clean-up on them to get them ready.

First, I took the ribs and removed the excess fat and the weird membrane. Then I brushed the ribs all over with a very light coating of cheap-o yellow mustard.

I whipped up a batch of this dry rub and coated the mustardy ribs in the rub. They then looked like this:


Dry rub on!

Dry rub on!

I left them to sit while I started up the Kamado Joe. I’m still learning (obviously) how to regulate the temperature, but I knew that I needed to do them “low and slow” – though various recipes called from temperatures ranging from 225 to 275. I went with 250F to keep it simple.

The 3-2-1 method that I found here seemed easy enough for me to follow – nothing complicated.

So, I tossed the ribs onto the pre-heated grill and set the timer for 3 hours… only to discover that I could not keep the temperature of the grill from going up and up and up. It didn’t help that the wireless digital thermometer I was using kept crapping out on me (and telling me that the temperature in the grill was about 40 degrees higher than what the thermometer on my grill said!)

I spent a lot of time running in and out of the house.

At the end of the 3 hours, however, things looked pretty good:


3 hours down, 3 to go?

3 hours down, 3 to go?


I took each chunk of ribs off of the grill and coated both sides liberally in honey and brown sugar (mmmm!) before wrapping them into little packages. No photo of this, sadly. While wrapping, I noted that the ribs looked more ‘done’ than I would have expected, so I decided to adjust the cooking time slightly.

I put the packets of meat back on the grill and set my timer for 40 minutes (instead of 2 hours). When the timer went off, I checked the internal temperature of the meat and found it was already at 190F. Eeep!

I unwrapped the meat, brushed both sides with a 50/50 mix of BBQ sauce and honey, and put them back on the grill for a total of 30 minutes (flipping them once after 10 minutes).

The 3-2-1 method became the 3-1-.5 method!

To be honest, I was pretty convinced that they would be overcooked – possibly dried out – given how dark the outside of the meat was. I was mentally making adjustments in my head, checking out some info on the Kamado Guru forums, and plotting how I’d do all of this differently for the next batch.

But when we sat down to eat… oh, holy heck, they were amazing. And not just the amazing that comes from spending 5 hours cooking something, either.

The outside was crispy and had some chewiness to it (from the honey/brown sugar) and there was a hint of a smoke ring on the inside, and the meat just fell off of the bone as we ate it.

So good. So very good.

So good. So very good.

It took 5 hours to make and about 10 minutes to eat them all. Totally worth it.

Next time I’m going to work on keeping my temperature a lot lower – I need to get used to the air flow and the vents and how they work together – but I would not be the slightest bit sad if the next batch turned out exactly like these did.

I’m so glad that I’ve got another package of ribs waiting in the fridge for next time.

Sriracha Brown Sugar Bacon Wrapped Onion Rings.

Oh god yeah.

Oh god yeah.

My friend Kevin is gleefully married to Brenna (who bakes). Together, they make all sorts of delicious foods. When Kevin posted a photo of this recipe on Facebook, I kind of lost my mind and immediately asked my husband (who was out grocery shopping) to please bring home some onions and some bacon.

The original recipe called for Vidalia onions – which, for those unaware, are a trademarked onion. This is why it’s hard to find them at some stores, or at various points in the year. Whenever you see a recipe that specifies Vidalias, you can pretty much always substitute a “sweet onion” (of whatever type).  The only caveat is that Vidalias are usually very large, so you may need to pick up an extra sweet onion to compensate for them being smaller.

Enough talking, let’s make these delicious onion rings!

Sriracha Brown Sugar Bacon Wrapped Onion Rings.

Ingredients:

2 large sweet onions
3 tablespoons sriracha garlic sauce
1 1/2 cups of light brown sugar
16 slices of bacon (thin cut – NOT thick)

Directions:

  1. Preheat your oven to 400F and make sure the rack is in the middle of the oven. Line a baking sheet with foil, place a cooling rack on top, and lightly spray the cooling rack with non-stick spray.
  2. Peel the onions and cut them into 1/2 inch rings. Do not separate the rings. Set aside.
  3. Place the brown sugar in a shallow pan (pie plate, brownie pan) and break up any chunks.
  4. Place the Sriracha in a bowl. Find a basting brush. If you’re an organized person, you’ll know where that brush is. For everyone else, look through all of your drawers until you find one shoved into the back behind the turkey baster.
  5. Separate the onion rings into double slices (two rings that fit together). Keep only the larger sizes of rings – you can use the smaller rings For this dish you want the larger rings. The smaller, inner rings you can set aside and use in another dish or compost or put in your sandwich. Whatever works for you.
  6. Take 2 strips of bacon and dredge them through the brown sugar, making sure to coat both sides. Here’s hint number one: the more brown sugar, the sweeter and gooey these will be – and the more likely your oven will start to billow smoke halfway through cooking. We all make choices and we live with them.
  7. Using your basting brush, paint the sriracha sauce all over the onion ring. Make sure you’re still keeping the two rings together – no need to get between them with the sriracha!
  8. Wrap the bacon around the onion – overlap slightly and keep it snug (but not too tight). The bacon will shrink a bit during cooking. It will take two slices to go around the ring fully. Don’t overlap too much because the bacon underneath won’t cook as well if you layer it.
  9. Set each wrapped-up onion onto the rack. Space them out nicely. Admire them. Note how they look a lot like bacon-wrapped donuts. Appreciate that fact.
  10. Place the tray into the oven and bake for 20 minutes. When the timer dings, gently flip each ring over.
  11. Cook for another 15-20 minutes. You know how bacon looks when it’s cooked perfectly? That’s how you’ll know when these are ready to come out of the oven.
  12. When they’re ready, take them off of the trays and put them onto a plate. They will be super soft and gooey (very gooey, if you used a lot of brown sugar). The bacon will get crispier as it sits, assuming you don’t just burn the hell out of your hands and mouth by eating these as soon as they hit the plate.

Notes:

We basically created a room full of smoke by using a pretty substantial amount of brown sugar (that subsequently dripped down onto the tray and burned). To prevent this, you can either use less brown sugar (what?!) or you could switch out the lower tray for a clean one after the first 20 minutes of cooking.

Here’s a photo of my husband in our smoke-filled kitchen.

A teensy bit of smoke. No biggie.

A teensy bit of smoke. No biggie.

Let’s Get Paleo.

Mighty tasty.

Mighty tasty.

If it hasn’t become wildly apparent, we don’t follow any particular eating plan around here. We eat meat and veggies. We eat breads and fruits. We’re not followers of low carb or paleo or .. whatever. If it’s food, chances are good one of us likes it.

I’m not afraid to check out recipes that are from a particular style of eating, though, especially if it sounds delicious and won’t require an investment in a huge number of ingredients that we won’t regularly use.

Over on Nom Nom Paleo, I found a recipe for Egg Foo Young-ish – it sounded like something my husband would like and the only ingredient we didn’t have on hand was the coconut flour. I picked that up at the grocery store.

I am not a fan of Egg Foo Young but these turned out to be SO GOOD!  I tweaked the recipe somewhat for our tastes and that’s what’s transcribed below. If I were in your shoes, I’d go check out the original recipe and see if it would work for you as-is.

Modified Egg Foo Young-ish

Ingredients:

4 large eggs
3/4 tablespoon dried minced chives
1 teaspoon dried onion powder
¼ cup coconut flour
½ teaspoon baking soda
1 cup frozen spinach, thawed and squeezed dry (you end up with about 1/3 cup of spinach)
2/3 cup diced ham (or any leftover cooked meat)
1/2 teaspoon of apple cider vinegar
1/2 teaspoon ground black pepper
coconut oil for frying

Directions:

  1. Whisk the eggs in a large bowl. Add in the minced chives and onion powder. Allow the chives to rehydrate.
  2. Stir in the coconut flour and baking soda. If you’ve never used coconut flour before, marvel at how rapidly is soaks up the eggs. Worry that you’ve ruined the recipe (you haven’t) and carry on anyway.
  3. Stir in the spinach, ham, vinegar, and black pepper.
  4. Heat the coconut oil over medium heat in a cast-iron pan (or on a griddle, if that’s what you’ve got).
  5. Divide the batter into 6 (I just used a spoon and shoved it around in the bowl a bit ’til it was divided a bit).
  6. Put one of those 6 blobs of batter into the pan. Press down gently to flatten – then cook for about 2 minutes. Flip and cook for another minute. The end result should be crispy on the outside!
  7. Cool ’til it reaches eating temperature.
  8. Repeat until you’ve used up all the batter.

Bacon Cheddar Biscuits.

Cheddar AND Bacon!

Cheddar AND Bacon!

For some inexplicable reason, I find biscuits difficult to make. They come out too dry. Too bland. Not puffy enough. (Or all of the above.)

My husband loves biscuits.

Of course.

I stumbled across a recipe that sounded easy and I tweaked it a bit for our own tastes. And it is SO GOOD that I’m sure no one in the house would complain if I made them every day. They’re easy, but they’re also crispy and buttery and very, very tasty.

Bacon Cheddar Biscuits

Makes about 20.

Ingredients:

2 1/2 cups of flour
1 1/2 tablespoons of white sugar
1 tablespoon of baking powder
1/2 teaspoon of salt
1/2 cup of cold butter, cut into chunks
1 rounded cup of shredded old cheddar cheese
1/2 cup of precooked, crumbled bacon
1 cup of whole milk
1 egg, beaten

Directions:

  1. Preheat your oven to 425F. Line a baking tray with parchment paper.
  2. In your food processor, combine the flour, sugar, baking powder, and salt.
  3. Toss in the chunks of butter and pulse into the chunks turn into crumbs.
  4. In a small bowl, mix the egg and the milk.
  5. In a large bowl, dump the contents of the food processor. Stir in the bacon and the shredded cheese.
  6. Pour the egg/milk mixture into the large bowl and stir.
  7. It will be sticky. Very, very sticky. Use your hands to gently combine everything, if needed.
  8. Lightly flour your counter and scrape the dough onto it. Using your hands, press the dough down until it’s about 1/2 an inch thick.
  9. Use a round cutter (I use a 2″ one) to cut out the biscuits. Place them on the baking tray, about an inch apart (they don’t expand much outward, but they do grow upward).
  10. Bake for approximately 10 minutes, or until they’re crisp and lightly browned.
  11. The original recipe said they could be frozen. I refuse to believe that there could possibly be any left over for that.

The Best Meatloaf Ever.

Growing up, I hated meatloaf. In fact, I wasn’t much of a fan of it in my younger-adult years; I ate it, but I didn’t like it.

Eventually I found a meatloaf recipe that was okay – but which literally took hours to cook in the loaf pan. Then, when it was time to eat, there’d be grease around the edges and the loaf would either fall apart when I tried to plate it or would seemingly glue itself into the pan.  I tried to adjust the ingredients, the cooking time, and.. nope. Since the taste was “okay”, but not awesome, I eventually just stopped making it.

Then I found a new recipe – it looked easier, used ingredients that I already had (and no dry bread crumbs or crackers were in it), and didn’t require me to prise it out of a loaf pan at the end.  I gave it a shot and, over the past year-ish, have made it multiple times. It’s SO good, and SO easy, and clean-up is a breeze.

The only catch is that it looks awful when you remove it from the oven – if you’re serving it to guests, don’t let them see it until it’s ready to eat.

Seriously, here’s what it looks like when it’s fresh out of the oven:

U-G-L-Y, right?

U-G-L-Y, right?

This is a bit flatter than how I normally make it – so it’s also a bit wider – but you can see how some of the glaze has slid off and burnt onto the foil. It does this every time. Quite frankly, this does not look at all like something I’d want to eat.  (One of the great benefits to cooking the loaf this way is that the foil underneath can simply be tossed – leaving no pan to clean after dinner!)

But here’s what it looks like plated:

Mmmmm!

Mmmmm!

Much better, right? A nice sticky-sweet-spicy glaze on top of the moist, but firm, meat. Seriously – this stuff is SO GOOD.

Here’s a closer look at the meat itself:

20131124_133420

Absolutely perfect meatloaf.

Here’s the recipe. The only substitutions that I make are that I use ground chicken instead of turkey – chicken is easier to find and much cheaper around here – and basmati rice (because we always have that around).

Everyone in my family loves this recipe and would happily eat it every week if I made it. My husband gleefully eats the leftovers (which we don’t often have) for lunch the next day. And in all the times that I’ve made it, nothing has ever gone wrong. It’s foolproof perfect meatloaf!

(Is it becoming obvious that I’m a HUGE fan of BudgetBytes? I am.)

Stromboli.

Easy, tasty!

Easy, tasty!

One of our family’s favourite dinners is Stromboli. No one ever groans when they see it on the table and everyone eats several pieces. My husband takes leftovers to work for lunch!

In a nutshell, Stromboli is bread dough that’s rolled up with some salami and cheese. Brush on some olive oil, sprinkle on some Italian seasoning, then bake for about 25 minutes.

My oven has a proof setting – so the two rises don’t take much time – and I rather enjoy the process of making the dough and kneading it. You can use store-bought dough if you were in a rush, but this is far tastier. We used store-bought once and haven’t done it again!

Here’s the recipe. I always double it (did I mention we love this?) and I leave off the banana peppers. We’ve used provolone cheese, mozzarella and, most often, we end up going with Swiss.  Mmmm.

Sloppy Joes!

I recruited my 13 year old son to help make some pressure canner sloppy joe sauce – and he pretty much did the whole thing himself with me giving him the tips and tricks as we went along. It’s his first time canning anything – I couldn’t be prouder.

Still bubbling!

Still bubbling!

Here’s the recipe:

Sloppy Joe Sauce

Makes 6 pints.

4 lbs ground beef
2 c. chopped onion
6 tsp. Worcestershire
3 cups ketchup (make sure there are no thickeners!)
1/2 c. water
4 T. brown sugar
4 T. apple cider vinegar
4 tsp. mustard

Directions :

  1. Prepare 6 pints, lids, and rings.
  2. In a large stainless steel pot, cook beef and onion over medium heat.
  3. While cooking the meat, mix all of the other ingredients in a large bowl, whisking to make sure it’s well blended.
  4. Drain the meat and onion mixture very well, removing as much fat as possible.
  5. Add all of the ingredients together in the large pot and bring to a boil, stirring often.
  6. Continue to cook at a lower heat for 20 minutes.  Remove from heat.
  7. Fill jars to 1 inch head space. Clean rims and apply lids and rings.
  8. Process pints at 11 pounds for 75 minutes.

To serve, open the jar and scoop into a pan. Heat it up and put it on bread, toast, buns, or whatever you normally use for your Sloppy Joes! (2 pints makes approximately 9 sandwiches.)

Pulled Pork.

Meat – the final frontier.  Or something like that, at any rate.

I’ve seen a lot of different recipes for pressure canned meat and figured it was worth a try. My canner came with basic information about canning meats, so I figured I’d go with something simple.

Pressure Canned Pulled Pork.

Ingredients:

12 pounds of pork shoulder (boneless)
1/2 cup of water
4 quarts of no-salt broth

Directions:

  1. Place pork shoulder into crockpot and add water.
  2. Set crockpot to “HIGH” and leave it for 1 hour.
  3. Turn crockpot down to “LOW” for 8-9 hours. Meat should be mostly cooked (“rare”).
  4. Bring 4 quarts of broth to a boil.
  5. Shred the pork, taking care to discard as much fat as possible. Put shredded meat into hot, quart-sized jars, leaving 1 inch of head space.
  6. Add boiling broth to each jar, leaving 1 inch of head space.
  7. Wipe jar rims clean and put lids and rings onto jars.
  8. Process at 11 pounds for 90 minutes.
  9. Jars should seal. If jars don’t seal, put them in the fridge and eat within a few days.
Pulled pork in jars!

Pulled pork in jars!

You can eat the meat straight out of the jars (it’s fully cooked!), drain it and heat the meat up with sauce (for pulled pork sandwiches), or you can use the meat in soup or other recipes.