Sweet Pickled Mu (Korean Radish).

Good things in jars!

Good things in jars!

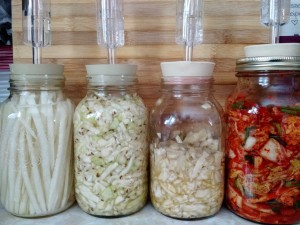
(From left: sweet pickled mu, sauerkraut with caraway and dill seeds, regular sauerkraut in the middle of a 4 week ferment, kimchi)

My husband really likes to eat the sweet pickled radish that garnishes his plate when we go out for sushi together. When we bought the ingredients for kimchi, we grabbed a second small Korean radish to use in an attempt to make something sweet and pickly at home.

Korean radish is similar to daikon – but bigger and a bit tougher in the core. Here’s a photo of a Korean radish next to a Japanese daikon radish. Eating it raw is slightly peppery (like radish) but mostly a mild sweetness. Very crisp and crunchy!

This was ridiculously easy to make – as most quick pickles are. My husband tasted it this morning (so, about 24 hours after I put it all in the jar) and declared that it’s exactly what he was looking for. We’re going to leave it out for at least another 24 hours before capping it and putting it in the fridge.

Sweet Pickled Mu

Ingredients:

1 small-ish Korean radish (mu or moo)
approx 3/4 cup of filtered water
approx 3/4 cup of vinegar (I used a mix of rice and white vinegars)
approx 3/4 cup of white sugar

Directions:

  1. Peel the radish and slice it in your preferred, ideally uniform, size. I used my mandoline for this and set it to 1/4″ french-fry slices. Avoid the core (it’s a bit tough, particularly in larger radishes).
  2. Put the slices into your jar. Fill it tightly, but there’s no need to pack it in.
  3. Mix the water, vinegar, and sugar together in a bowl. I used a mix of rice vinegar and regular white vinegar (about 50/50) but you could use either one on its own.
  4. When the sugar is dissolved into the mixture, pour it over the radish slices in the jar.
  5. Put your stopper and air lock in place.

Notes:

Since I was using an air lock, I didn’t worry much about fully covering the radish with the brine – as the radish softens, it starts to drop below the liquid anyway. If you’re not using an air lock, make sure to cover your radish completely (or weight it down under the liquid) to prevent mould.

The flavour is sweet and tangy – not spicy or hot. If you are wanting hot spicy pickled radish, you can add a hot pepper to the jar (washed, stem removed) to the jar before adding the radish. I haven’t tried this.

You can use ANY radish that you want in this recipe – the little round red ones from the grocery store, even! It’s a matter of what’s on hand, what you want the end result to look like, and what flavours you’re looking for.


Kimchi.

Kimchi!

Kimchi!

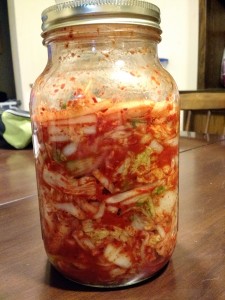
While my sauerkraut is bubblin’ in the jar, I figured I would try something a bit fancier – kimchi. The concept is exactly the same: chop stuff and ferment it. The difference is that kimchi includes spices and seasonings. This big jar will need to sit around for about a week before I taste it – by which time it should be really stinky and (hopefully) good.

I started out shopping at the “Asian Superstore” in my city – where I promptly ran into difficulty with my lack of non-English reading skills. Specifically, I was looking for the gochugaru by trying to compare a google image of the word (in Korean) with various packages. And that store had hundreds of packages that could have been what I wanted. The store was busy enough that I literally couldn’t find anyone to help me – so I grabbed what looked approximately correct… and them promptly worried that I was going to create a disaster in my jar.

When I posted my dilemma on Facebook, my friend Melle recommended a local store at which I was able to pick up the authentic ingredients; there are plenty of recipe variations out there, though, if you don’t have a local Korean shop.  In this case, the lovely woman working at the store was also able to grab some napa cabbage for me from the secret stash in the back – and gave me some advice on ingredients. Awesome.

Anyway. I’ll report back in a week or so as to how things turned out – in the meantime, here’s the recipe.

Kimchi

Ingredients:

  • 2 pounds of napa cabbage
  • 1/2 cup salt (kosher – no additives)
  • 8 ounces Korean radish (“mu”), peeled and cut into 2-inch strips
  • 4 green onions, cut into 1-inch pieces (include the green part)
  • 1/3 cup gochugaru (Korean red pepper powder)
  • 1/4 cup minced ginger (peeled)
  • 1 tablespoon minced garlic
  • 1 teaspoons Korean salted shrimp, minced
  • 1 teaspoon fish sauce
  • 1 1/2 teaspoons granulated sugar


Directions:

  1. Remove the outer leaves of the cabbage and cut out the core. Chop the cabbage into 2″-sized chunks and place in a large bowl.
  2. Sprinkle the salt over the cabbage and use your hands to work it in – crunching things up a bit as you go. Pour cold water over the cabbage, set aside, and let it soak overnight. Cover it with a clean dish towel or saran wrap to keep lint from getting in.
  3. The next day, rinse the cabbage with cold water. The leaves will have softened! Yay! Drain it well, squish out as much water as you can, and set aside.
  4. In a large bowl, combine all the other ingredients. To prevent staining (and hot pepper burning) wear gloves – I used nitrile gloves, but you can use latex or whatever’s handy as long as they’re clean.
  5. When everything is happily mixed, add the cabbage. Use your hands to squish it all together more – get everything well-coated and happily melded together.
  6. Pack it all into a 1.5 liter glass jar. Make sure it’s pressed down firmly.
  7. Put your stopper and airlock onto the jar, fill the airlock with water (see note), and set aside for a week.
  8. Ta-da! Kimchi!


Notes:

The hardest part of this recipe is all the chopping and mincing and whatnot. I totally ‘get’ why someone would make a triple batch to put off having to do it again soon. If this turns out well, and if I try to make another batch, I’ll at least double it.

In recent emails with Geoff, from Canuck Homebrew Supply, I have learnt that water is not the most ideal thing to put into your air lock. There are some special products available (food safe) or you can use vodka! And who doesn’t love the idea of needing to buy vodka for healthy purposes? Not me, that’s for sure.  You CAN use water, and I’d say it’s especially okay for a short-term ferment, but I am not a scientist and I do not play one on TV either. So.. yeah.

The original recipe that I found for this required 1/4 cup of fish sauce. I couldn’t bring myself to use that much. Time will tell whether I regret that or not. I feel pretty sure that I won’t. If you decide to use that much fish sauce, you should also increase your salted shrimp to 2 teaspoons because I also decreased that quantity because…

Salted shrimp are possibly one of the grossest things I’ve ever seen, let alone put into a recipe, but people seem to swear by them so .. they’re in there. I will try not to think about their beady little eyes when I’m eating the kimchi later.

And, finally, if you can’t find any regular mouthed 1.5L jars (I used wide-mouth because I already had some) you can make an adapter for your #13 stopper using a yogurt lid. Yes, for real. Here’s the instructions for that. I made my inner circle the size of the stopper, rather than a smaller jar lid, and it worked beeee-yooo-tifully. At least, so far.

Fermented Carrots.

Sauerkraut and her friend Carrots.

Sauerkraut and her friend Carrots.

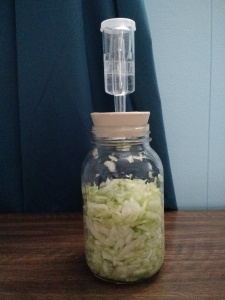
After getting the sauerkraut started, I decided to whip up a small batch of carrots to ferment, too. I used the same physical setup as the sauerkraut – a 1 quart mason jar, air lock, and #13 drilled stopper (bung? ha!) ordered from Canuck Homebrew Supply.

Using my mandoline, I sliced the carrots into uniform sized chips and did the same with the garlic (being really careful not to mandoline off the tips of my fingers). I mixed the salt in, waited a few hours, then added just enough water to cover the top of the carrots. By the next morning, happy little bubbles were already starting to form!

Fermented Carrots

Ingredients:

0.5 pounds of organic carrots
2 cloves of garlic
1 teaspoon of salt (no additives – kosher salt is what I used)
enough water to cover the carrots

Directions:

  1. Slice the carrots into uniform chips – I used a mandoline. Do the same with the garlic.
  2. In a small bowl, combine the carrots, garlic, and salt. Use your hands to squish them together and crunch them up a bit.
  3. Put the carrots and garlic into your clean mason jar – including any carrot or garlic juices that were made during the crunching process.
  4. Leave it in a warm spot for a few hours – until there’s a decent puddle of carroty juice in the bottom of the jar. Add enough water to cover the carrots in the jar.
  5. Put your stopper into the jar and add your air lock – add water to the air lock.
  6. Set aside for a few days.  You can watch the bubble form on the 2nd day – this is a good sign!
  7. Taste as often as you like – until it tastes good to you – and then put a regular lid on and store in the fridge.


Small Batch Sauerkraut.

Wannabe Sauerkraut

Wannabe Sauerkraut


There are times when you want to get out your giant ceramic fermenting crock – and then there are (more) times when you really don’t.  Over the holidays I was reading up on small batch fermentation and the pros and cons of doing it in mason jars. I have a lot of mason jars.

One of the suggestions that kept coming up was to use an air lock, the same kind used in various homebrew applications, to make sure that you weren’t letting any gross stuff get into the mason jar. Apparently some people find that the shape of the mason jar makes it hard to keep contents fully submerged – and leaving food stuffs exposed to air isn’t a great idea if you don’t want to dry out and/or get mould on everything you’re making.

I went online and ordered two 2-piece air locks and two #13 bungs. (*tee hee*) The #13 fits nicely into the top of a standard mason jar (not wide mouth).

Since I just started this batch today, I have no idea how well it’ll turn out, so I’ll write another post in the future when I get to taste it. In the meantime, I kept it nice and simple and here’s how I did it.

Small Batch Fermented Sauerkraut

Ingredients:

A small green cabbage
1.8-ish teaspoons of plain salt – no iodine added (kosher salt is good!)

Directions:

  1. Remove the outer leaves of the cabbage. Chop or shred the inner portion into the size you want.
  2. Weigh 1 pound of shredded cabbage, put it into a bowl, and add the salt.
  3. With clean hands, squish the salt into the cabbage. Grind it! Crunch it up! You want the salt to get into the cabbage and start pulling out the water – this is not the time to be gentle and delicate. Show that cabbage who’s in charge!
  4. Put the cabbage, and any juice that you made during your squishing of it, into a 1 quart mason jar. Using anything you have handy (like the handle of a spatula), press the cabbage down firmly into the jar. Pack it in there!
  5. Wipe the rim and put the bung (*tee hee*) in place. Add water to the air lock and put it in the bung hole (oh, come on).
  6. The cabbage will start to make its own brine overnight (if not, see below). Your job is to watch the bubbles start as the fermentation process gets going. In 2 or 3 days, taste it – use a clean utensil (people seem to prefer chopsticks) and don’t double-dip.
  7. If it’s yummy, and you’re satisfied with it, remove the bung (ha!), put a normal lid on, and store it in the fridge.  If it’s not ready yet, put the bung back in and give it another day. Or two, or three..   It’s a matter of personal taste.

Plenty of Notes:

If your cabbage doesn’t make enough brine to be mostly submerged, you can add brine by dissolving 1 tablespoon of salt into 1 cup of water.  The important difference between fermentation with an air lock vs without  is that you do not need to keep your food fully submerged with an air lock (you do need to keep it fully covered with brine in the regular fermentation process.) Airborne bacteria or moulds or whatever can’t get into the closed-up jar – so you can cheerfully thank your bung for making this entire process easier. Ha!

Also, I am clearly five years old. My apologies.

Double-also, you can also refer to the bungs as “drilled stoppers”. Y’know, if you’re not 5.

While most recipes note that the sauerkraut is ‘ready’ in a few days, inasmuch as it tastes good, there is research showing that the probiotic cultures aren’t fully active and happy for at least 4 weeks.  If you are making the sauerkraut solely because you want to toss some on a grilled-up Reuben sandwich, well, 4-5 days is okay (if the taste is good to you)! If you’re more interested in eating it ‘raw’ because you want more of the health benefits, leave it longer.

To learn more about fermentation and other good things, you should visit Well Preserved.

I ordered my supplies (other than the mason jars) from Canuck Homebrew Supply. They are not paying me to write this post – I was just really impressed with how quickly they got my package to me, and how fast they replied to my email inquiry. So, if you’re looking to buy online, they’re my recommendation!

Guest Post: Michelle’s Kim Chi Style Fermented Veggies

This is a guest post from my friend Michelle – enjoy! 

I really like to ferment things.  I’ve made pickles, yogurt, honey wine, and sauerkraut.  I’ve got a continuous brew of kombucha on my counter.  I’m trying sourdough.  The bubbly goodness makes me a bit giddy.  The fact that there are little bacteria at work making food good to eat is enchanting.  It grosses some people out, but it’s good stuff.

If you’re concerned about safety and getting sick, you can read up on the whole process.

http://www.extension.umn.edu/food/Food-Safety/preserving/pickling/making-fermented-pickles-and-sauerkraut/

You can also read this.

According to Fred Breidt a microbiologist with the USDA – “properly fermented vegetables are actually safer than raw vegetables, which might have been exposed to pathogens like E. coli on the farm… With fermented products there is no safety concern. I can flat-out say that. The reason is the lactic acid bacteria that carry out the fermentation are the world’s best killer of other bacteria,”- San Francisco Gate, June 2009.

I make sure I’m using clean crocks or jars with no cracks.  And I make sure that there are no vegetables sticking up over the brine.  More on that later.

One of my favourite fermentation authors (yes, I have favourite fermentation authors) is Sandor Katz.  His first book “Wild Fermentation” is very easy and very approachable.  He’s got some amazingly simple recipes to get you started.  I refer back to him whenever I’m making a ferment for proportions and ideas. (http://www.wildfermentation.com)

There are many, many ways of fermenting.  And many, many things you can ferment.  I mostly stick to vegetables.  With some forays into dairy products (yogurt), and fruit for alcohol.  The 3 main methods of fermenting vegetables that I use are a) salting, b) preserving in brine, and c) pre-soaking in brine.  For a kim chi style, I’m using the pre-soaking in brine method.  For this, I’ll pre soak the vegetables overnight and add the spices to the drained salty vegetables.

I should actually start with sauerkraut, which is basically just cabbage and salt.  But I’m not.  Sandor Katz has a great how-to on his website. (http://www.wildfermentation.com/making-sauerkraut-2/)

Ready to start?

First I go and look in my fridge and pull out whatever looks good.  Today I pulled out red cabbage, carrots, chinese cabbage, green onion, and bok choi.  I coarsely chopped these all together and threw them into a crockery bowl.  Use something food safe – good options include glass and old style crocks. I do use stainless steel for my prep, but not for the actual fermenting stage.  I have used plastic, it’ll work, but if you’re worried about leeching chemicals find something else.

Chopped veggies!

Chopped veggies!

Here’s my mixed and chopped vegetables.  It’s a matter of what flavours and textures you think would work well together.  In this case, I used about an equal amount of red cabbage, Chinese cabbage, and bok choi leaves.  Then I threw in 2 chopped up carrots and 3 chopped up green onions.  I also added Kombu strips.  This is a seaweed.  Good minerals and extra flavour.  I cut it up with scissors directly into the veggies.

(Other veggies I have used – swiss chard, beet greens, jerusleum artichokes, radish, dandelion greens & root, parsnips, celery, kale, turnip greens and turnips.  Be creative!!!)

Next step is to make your brine.  I use coarse salt or sea salt.  And tap water.  Fresh tap water.  This is actually not recommended.  It should be de- chlorinated.  But I’ve been doing this for several years and haven’t had any problems.  Especially with the kim chis.  If you want to de-clorinate your tap water, fill a wide mouthed vessel the night before and let it sit overnight.  The chlorine will evaporate off.

Use 4 TBSP of salt to every litre of water.  Today I used 2 litres of water and 8 TBSP of salt.  It will be VERY salty.  Pour the brine on the vegetables.

Once that’s all together, cover it with a clean cloth and let it sit overnight in the brine.

The next morning, you’re going to pull together the spices.

This is a “to taste” step.  If you like more spice, add more peppers.  If you adore garlic, throw it in.  I used ginger, garlic, onion, and dried chill peppers.  Sometimes for kim chi I add in fermented fish sauce.  This is the only time I add an animal product to a ferment.  This time I’m making a vegan version, so I omitted it.

Pre-Ninjaed Spices!

Pre-Ninjaed Spices!

Then I “Ninja”ed it.  I love my Ninja.  You can chop, food process, or otherwise smoosh into small pieces.

Then I turn my attention back to my veggies in brine.  I drain off the brine.  And taste the veggies.  They should be salty, but not TOO salty.  Think French Fries.  Rinse them off if they’re too salty, add more salt if you don’t find them salty enough.

Then mix the spices with the drained veggies!!  Now comes the fun part.  Find a glass jar or a crock of the appropriate size.  I use mason jars, flip top jars, or glass crocks from Ikea.  Today I’ve got a flip top jar.  Put the mixture into the jar and press it DOWN.  You want it squished.  You want a bit of juice on the top.  You want to leave some space at the top of the jar.  I normally fill 2/3s.  You DON’T want any food particles on the side of the jar above the veggies.  They will mold.  I use spoons, or fingers.  But be aware that you’ve just put hot peppers into this.

Almost done!  Now you need to weight the veggies.  Basically any solids exposed to air will mold.  Fermentation = good.  Mold = not so good.  So we want to get all the veggies below the liquid, while still allowing the gases to escape.  (Yes, your ferment will produce gas!)  There are all sort of options for this.  A clean stone, a plate, a special weight, a fancy dancy air lock system.  I use a plastic bag.  I like the freezer ziploc bags as they’re sturdy, but will also use sandwich bags for small ferments.  Put water in the bag, basically just a little less then the amount you need to fill the space you left in your jar. Again, I use tap water.  Now add salt, in about the same proportion that you used for the original brine. That way, if your bag leaks, you’re not diluting your ferment.  I used about 2 cups water and 2 TBSP salt.  I’m not good at measuring.  Then get all the air you can out of the bag, and seal the bag.

Take your bag o’water and squish it into your jar.  Squish it until the juice squeezes out the top a little bit and the veggies are not in contact with air.  Again, this is important.  Veggies in contact with air will mold.  Mold isn’t great.  Juice is ok in contact with air.  Put the jar on a plate, because it will overflow a bit when the fermentation starts, and place it out of the way.  I keep it in my kitchen where I can look at it and check it daily.

Ready for fermentation!

Ready for fermentation!

Kim Chi takes about a week to “ripen”, but this is temperature sensitive.  Warm ferments finish faster, cool ferments slower.  Therefore, after the 4th day, start checking it.  Pull out the baggie, and taste the ferment.  It should be a sour yummy taste.  If it’s not sour enough, wash the baggie, put it back in, and let it ferment some more.  If you like the flavour, put it in the fridge to slow the ferment.

Big question.  How do I know if it’s bad?  Smell it a bit.  Taste a tiny bit.  Do you like what you smell/taste?  Then it’s not bad.

Sometime else about mold.  Which will just make Violet squirm.  I lied a bit.  Sometimes a bit of mold is ok.  If you get a bit of white mold on the top veggies, cause they were exposed to air, just pick them off and push the rest under the juice and keep going.  If you get any other colour mold, then feel free to chuck it.

I like this kim chi as a side to just about anything.  Or in an oriental style soup.  Or straight out of the jar.  I’ll report back when mine is ready and let you know how this batch tastes!