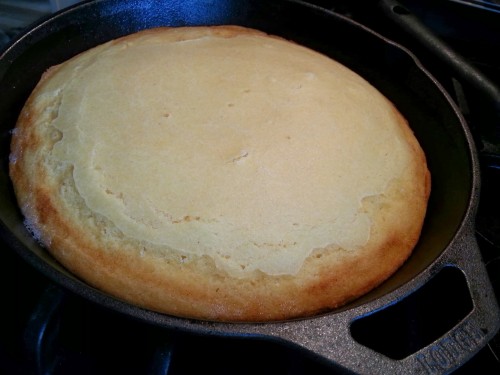
Skillet Cornbread.

Buttery!

Buttery!

My husband loves cornbread. I don’t have any objections to it – it’s usually sweet and buttery, and I’m good with that – but I don’t seek it out or get excited by the idea of it.

Having recently acquired a 10″ cast iron skillet, I decided that my first recipe would be cornbread. It was easy to make, it turned out wonderfully, and I ate several pieces. More than my husband. Next time I’ll add some minced jalapenos!

Here’s the recipe:

Skillet Cornbread

Makes one lovely round 10″ loaf of cornbread (see notes)

1 1/4 cups ground cornmeal
3/4 cup flour
1/4 cup white sugar
1 teaspoon sea salt
2 teaspoons baking powder
1/2 teaspoon baking soda
1/3 cup whole milk
1 cup buttermilk
2 eggs, lightly beaten
1/4 cup of unsalted butter (melted)

Directions:

  1. Preheat the oven to 425F.  Put the cast iron skillet into the oven to heat while you’re preparing the batter.
  2. Mix the cornmeal, flour, sugar, salt, baking powder, and baking soda together. Stir in the milk, buttermilk, and eggs.
  3. Add almost all of the melted butter, stirring. Save about a tablespoon of melted butter for slickin’ up the skillet later!
  4. Remove the hot skillet from the oven and drop the oven temperature to 375F.
  5. Coat the bottom and sides of the skillet with the remaining melted butter. Use a basting brush to coat the sides.
  6. Pour the batter into the skillet and bake in the centre of the oven for about 17 minutes.  (See notes)
  7. The cornbread is done with the centre is firm and a toothpick comes out clean.
  8. Allow to cool slightly before serving.

Notes:
You could make this in a larger, or smaller, skillet – for a smaller skillet, add time. For a larger skillet, decrease time. Just keep an eye on it!

Swedish Pancakes.

Growing up, I often spent a weekend (or even a full week) sleeping over at my maternal grandmother’s house.  Her maiden name was Daisy Ida Marie Skoog. One of the highlights of staying over was waking up to find her heating up the pancake pan and using her hand mixer (it looked like this one, but with a black handle) to get the batter ready.

When Nana died, I inherited her pancake pan. I didn’t use it at all, however, because I wasn’t sure how to use it – so it went into a box with several other things that I treasure but don’t use/display.

This week I decided to dig it out, clean it up, reseason the cast iron, and make some good ol’ Swedish pancakes.

Here’s a photo of the cleaning up of the plett pan.

Plett, salt, and potato.

Plett pan, salt, and potato.

The basic idea is to sprinkle the cast iron with coarse salt and use a wedge of potato to scrub off rust, flaky bits, or anything stuck to it. I rinsed once, then repeated the process, and the pan came out beautifully. I then oiled it up with a fine coat of vegetable oil and put it in the oven for an hour at 300F to reseason the cast iron. Let it cool and TA DA! Reseasoned cast iron!

I have several children and making Swedish pancakes for a meal, for all of them, would have required me to start at 7 am and work all morning – so, instead, I made them as a snack.  I have my grandmother’s recipe but, recognizing that she didn’t bother to measure anything, I adjusted it slightly to bring it all closer to what I remember the texture, flavour, and appearance being when I was a kid.

Here’s a plate of Swedish pancakes with some homemade jam:

Little Pancakes!

Little Pancakes!

The first attempt was too dark, the second was too thick, and finally, finally, they turned out just right for the remaining 10-ish attempts. Lightly golden, slightly crisp at the edges, and sweet.  You could adapt these to be made in a regular pan (I realize that the plett pan is a bit of a random thing for most people). As a kid, I could eat an entire batch on my own.

Here’s the recipe:

Daisy Ida Marie Skoog’s Swedish Pancakes

Makes a lot of pancakes. No idea how many.

Ingredients:

3 eggs, beaten
2 cups of milk
1 1/4 cups of flour (see notes)
6 tablespoons of melted butter (see notes)

Directions:

  1. Combine all ingredients together. Mix well.
  2. Heat pan to medium (see notes). Brush lightly with a bit of butter.
  3. Spoon a small amount of batter into each section.
  4. Cook until puffed up (small bubbles form), flip the pancakes, cook until golden.

Notes:

  1. The original recipe called for just 1 cup of flour. The batter was so runny and didn’t cook well in the pan. I increased by about a quarter cup.
  2. I think I could have used less melted butter in the batter and, next time, I’ll decrease to 4 and see what happens.
  3. “Medium” for the pan was around a ‘4’ on my gas range. I don’t normally cook on cast iron pans, so it took a bit of adjusting for me to get a temperature that wasn’t ridiculously hot or too low. It should take about 2 minutes to cook a pancake – one minute per side, give or take a bit.

“Artisan” Bread.

Crusty, tasty bread.

Crusty, tasty bread.

Everybody loves this recipe because it really and truly is as easy as it looks. And everyone makes it and says, “I think I did it wrong..” because of the wet dough and the fact that it just seems WAY too easy for anyone who’s ever made bread before (or who has decided not to make bread because it seemed too difficult).

“Artisan” Crusty Bread
Makes one lovely loaf.
3 cups unbleached all purpose flour
1 3/4 teaspoons salt
1/2 teaspoon Instant or Rapid-rise yeast
1 1/2 cups water
Directions: 
  1. Combine flour, salt, and yeast into a large bowl.
  2. Add the water and mix (by hand) until everything is combined and rough looking.  The dough is very, very soft – you won’t need to put much effort into mixing this up.
  3. Put a lid on your bowl, or cover with plastic cling wrap. Set it aside for a minimum of 12 hours (and as many as 24). The dough blob will get much larger, look very bubbly and wet, and you’ll be concerned that you have done something wrong. Don’t panic.
  4. Heat the oven to 450F.  While the oven is preheating, place a cast iron Dutch oven (and lid) inside. Once the oven has reached 450, start timing for 30 minutes. (The Dutch oven is empty. No bread dough in there.)
  5. While the oven is heating, heavily flour your counter and dump the dough on top. It will be very sticky, wet, and goopy. You will again be concerned that you have done something wrong. Don’t panic.
  6. Shape the dough into a ball – not kneading, just sort of prodding it into shape –  and cover the ball with plastic wrap. Set aside until the 30 minutes of Dutch oven-heating are finished.
  7. When the oven has heated, and the Dutch oven has been inside for 30 minutes, pull out the Dutch oven and plunk the dough into it. You can use a layer of parchment paper if you like (I did) to make it easier to transfer the dough from the counter into the really, really hot Dutch oven.
  8. Put the lid on the Dutch oven and put it back into the oven for 30 minutes.
  9. After 30 minutes,  remove the lid.. and bake an additional 15 minutes.
  10. Remove bread from oven, pull it out of the Dutch oven, and place on a cooling rack to cool.
  11. Cool fully before slicing. Enjoy the crackling noises!

Updated to add:
You can make this in a Dutch oven that’s as small at 3 quarts, apparently. I used a 6 quart and the loaf sat in the middle and didn’t get anywhere close to the sides. All good!  You can also make it in any oven-safe pot with a lid, according to the internet.

Lemon Fudge.

You would think that I’d have taken a photo of this fudge, but I didn’t.

So, close your eyes and picture a small square of yellow fudge.

Honestly, this doesn’t look fancy AT ALL, but it’s pretty tasty.

“Keep Stirring For The Love of..” Lemon Fudge.

Makes an 8×8 tray. Cut ’em small!

Ingredients:

2 ¼ cups white sugar
¾ cup evaporated milk
9 ounces white chocolate, cut into small pieces
1/2 cup of cold butter, cut into small pieces
1 ½ tablespoons lemon extract
zest of one lemon (zested!)
yellow food colouring (I used gel colouring)

Directions:

  1. Spray an 8×8 square pan. Set it aside.
  2. In a large pot, over medium heat, combine the sugar with the evaporated milk. Stir it until it boils, turn the heat down a notch or two (keep it bubbling, just not as hot) and stir and stir and stir.
  3. Keep stirring for 6 minutes. Curse this entire process.
  4. After 6 minutes, turn off the heat and all the other ingredients – while stirring. I used my hand mixer for this part because I was really, really tired of stirring.
  5. Once the mixture is smooth and creamy, and the colour is right, pour it into the prepared pan. Smooth the top if you’re fancy like that.
  6. Set aside until the pan is cooled – then put the pan into the freezer for at least 20 minutes. This will make the fudge much easier to slice and remove from the pan.
  7. Slice the fudge small – this stuff is wildly creamy and sweet!

Peanut Butter Cup Cookies.

These are so easy to make. At least, they’re easy if you own more than one mini muffin pan – which I thought I did, until I started baking. My husband ran out to get more.

Around here, the mini peanut butter cups come in a resealable bag. I don’t understand why. Who’s going to seal that back up and walk away? Not me.

I could not, for the life of me, get the chocolate to ‘drizzle’, so my husband used a knife and flung the chocolate on top. Worked perfectly.  The cookies that I ‘drizzled’ just had blobs of chocolate on top – still tasty, not so pretty.

Drizzling chocolate is not as easy as you'd think.

Drizzling chocolate is not as easy as you’d think.

Peanut Butter Cup Cookies

Makes about 36-ish.

Ingredients:

1 1/2 cups flour
3/4 tsp baking soda
1/2 tsp salt
|1/2 cup butter, room temperature
1 cup peanut butter
1 cup sugar + extra for rolling
1 egg, beaten
2 tsp vanilla
36 peanut butter cup minis (one bag)
1 cup semi sweet chocolate chips, melted

Directions:

  1. Preheat oven to 350F
  2. Mix the flour, baking soda, and salt. Set ’em aside.
  3. Cream together butter and peanut butter, then add 1 cup of sugar. Beat until it’s delightfully fluffy.
  4. Add the egg and the vanilla.  Mix a bit more.
  5. Add in flour mixture and.. yep, mix it up a bit more.
  6. Roll dough into 1 inch balls, then roll them in sugar. Put ’em in mini muffin pans and gently press a mini peanut butter cup into the centre of each ball.
  7. Bake for about 8 minutes.
  8. When fully cooled, drizzle with melted chocolate chips. (Microwave them for 30 seconds at a time, stirring to melt!)

Sugar Cookies and Frosting.

‘Tis the season to make cookies, right? So I searched all over the place to find a sugar cookie that wasn’t too crisp, wasn’t too soft, and wasn’t too difficult to make. I’m okay with making dough and putting it in the fridge for a bit – I’m not okay with anything that requires me to scald milk or anything along those lines.

And so, I present some soft, sweet, really tasty sugar cookies. The recipe is below – and I’m including the recipe for the frosting that I used because it, too, turned out to be quite lovely!

Unfrosted stars!

Unfrosted stars!

Sugar Cookies

Makes about 4-5 dozen cookies

Ingredients:

5 1/2 cups flour

  • 1 teaspoon baking soda
    1/2 teaspoon salt
    1 cup sour cream, room temperature
    1 cup unsalted butter, room temperature
    2 cups sugar
    2 eggs
    1 teaspoon vanilla

Directions:

  1. In large bowl, whisk together flour, baking soda, and salt. Set this bowl aside for a bit.
  2. Using an electric mixer, cream the sour cream and butter at a low speed. Add the sugar, eggs, and vanilla and mix until combined.
  3. Sloooooooowly add the flour mixture to the sour cream mixture, and mix until everything is combined. The dough will be sticky to touch.  Your mixer will probably protest a little. Scrape down the sides and make sure everything is combined!
  4. Divide dough into two chunks. Wrap each chunk in some plastic wrap and flatten them. Put them in the fridge for at least 2 hours – or up to 3 days.
  5. When you’re ready to bake them, preheat your oven to 350 degrees. Line your baking sheets with parchment paper.
  6. Flour the crap out of your counter or work surface – this dough is sticky! Cover your rolling pin in flour, too.
  7. Set one of the chilled dough chunks on top of the floured surface and liberally coat the top with even more flour. Roll the dough out until it’s about 1/4″ thick.
  8. Cut out dough shapes using a cookie cutter. If needed, put flour on that, too.  Put the cut-outs onto your baking sheets.
  9. Bake for 8-10 minutes.
  10. Here’s the trick – bake them until there’s just the tiniest hint of brown on the bottom. This will keep them soft.
  11. Move the cookies to a rack to cool, then frost them!


When you frost them, the stars turn into circles! (No, not really.)

When you frost them, the stars turn into circles! (No, not really.)

Sugar Cookie Frosting

Makes about 3 cups

Ingredients:
1  package cream cheese, room temperature
1 cup powdered sugar (plus more to taste)
2 tablespoons milk
1 teaspoon vanilla extract

Directions:

  1. Beat cream cheese on medium speed for 1 minute, or until creamy and soft. Add powdered sugar, milk, and vanilla. Beat for another minute or two, to make sure everything is smooth and fluffy.
  2. Crank the mixer speed up to high and beat for 2 more minutes. Taste. Try not to eat all of it with a spoon. Add more powdered sugar if needed (for taste).

Spinach Quiche Casserole.

In theory, this could have been a healthy meal – after all, it does contain plenty of spinach and a few eggs. But no, this is not a healthy dinner.

It is, however, very tasty.

Like many foods that taste really, really good, this does not look remotely appealing in photographs. I strongly suggest that you overlook that fault and make it anyway.

Spinach! Cheese! Mmmm!

Spinach! Cheese! Mmmm!

Spinach Quiche Casserole

See the picture above? This recipe made 8 servings that size. 

Ingredients:
2 blocks of frozen chopped spinach, thawed and drained
500 ml container of cottage cheese (2% or higher)
1 1/2 cups of cubed old cheddar cheese
3 eggs, beaten
1/4 cup of butter, cut into about 12 chunks
3 tablespoons of flour
salt and pepper (to taste)

Directions:

  1. Preheat oven to 350F.
  2. In a bowl, mix the spinach, cottage cheese, old cheddar cheese, eggs, flour, salt and pepper, and half of the butter chunks.
  3. Pour into a glass casserole dish.
  4. Top with the remaining chunks of butter, randomly.
  5. Bake for 45 minutes or until the top is slightly crisp and everything is gooey and melty.

Notes:
No need to grease the casserole dish ahead of time, trust me. We didn’t use salt or pepper – this turned out perfectly tasty. It is not health-food – it’s full of melted cheese.  I like to think that it’s possible for the huge amount of spinach to somehow negate the melted cheese – but I’m not a scientist.  This should probably be a side-dish but man, we just ATE IT.

I Can See Through Time Pie.

You could probably make this a lot prettier if you smoothed the top and removed the crust from the tinfoil pan.

You could probably make this a lot prettier if you smoothed the top and removed the crust from the tinfoil pan before serving it.


Be forewarned – this pie is unspeakably good, unspeakably thick and rich, and will leave you so high on sugar and chocolate that there’s a good chance you’ll be able to see through space and time. This recipe is specifically recommended for people with powerful blenders (Blendtec or Vitamix or whatever) because the ‘batter’ is really, really thick and heavy and there’s a good chance it would just burn out the motor in a normal blender. Seriously. It’s that thick.

The resulting pie is really dense and tastes deliciously like chocolate and coconut. You will need several glasses of milk or hot coffee to get through a slice but it’ll be worth it.

I Can See Through Time Pie

Ingredients:
1 pre-made 9″ pie crust of your choice (or make your own from scratch)
2 1/4 cups of maple syrup
2 1/4 cups of cocoa powder
1 cup of coconut oil (or coconut butter)

Directions:

  1. Blend the syrup, cocoa, and coconut oil together until it’s no longer grainy and has a silky (thick) texture.
  2. Pour the mixture into the pre-made pie crust. Smooth the top if you want it to be pretty.
  3. Put it in the fridge for at least 3 hours or overnight.
  4. Remove from the fridge and use a hot, moist knife to cut into slivers.
  5. Eat it while making obscene noises.

Notes:
I used a pre-made graham cracker crust which was lacklustre – next time I’d make my own crust and probably add in some cinnamon. Really, though, no one is interested in the crust on this pie.

I cut myself what I thought was a thin slice – I should have made it about half the size that I did. Meanwhile, my 13 year old son had one that was about 4 times the size of my slice – here’s a photo:

He should have plenty of energy this morning.

He should have plenty of energy this morning.

Violet’s Cheatie Kringles.

The cheatiest Kringle EVER.

The cheatiest Kringle EVER.

My husband hails from Wisconsin which is the Land of Kringle. He requested Kringle for Solstice this year (we don’t celebrate Christmas). The last time he asked for a Kringle I just mail-ordered it – a process that turned out to be ridiculously complicated. We live in Canada, you see, and there are rules about how things can be shipped and extra costs for pastries (or something) and, in the end, it was stupidly expensive.

I figured it couldn’t be that hard to make one at home – I mean, it’s food. And, if it didn’t turn out, I’d just get out ye olde credit card and buy one from Wisconsin.

My first attempt was awful in terms of what you’d expect from a Kringle. I’m not from Wisconsin and even I knew it wasn’t authentic by any stretch of the imagination. I had my suspicions after viewing the recipe, but I figured it couldn’t hurt to try.

Nope. There’s a reason that recipe isn’t posted here.

In order to make the official O&H version, I discovered that I would need to spend 3 days in the process. I intend to attempt this during the Christmas holidays – when I have 3 days off in a row and the patience to spend rolling things out. When that happens, I’ll post again to let you know how it turns out.

In the meantime, however, I made the easiest cheatiest Kringle EVER and my beloved husband really liked it and, so, I am going to share the recipe. If you can call something that uses frozen pastry a recipe.

Violet’s Cheatie Kringles

Makes 2 Kringles.

Ingredients:
1 box of frozen puff pastry (contains 2)
8 ounces of cream cheese, softened
1/4 cup white sugar
1 can of pie filling (your choice of flavour)
1 egg
2 tablespoons white sugar (or coarse, if you’re fancy)
1 cup powdered sugar
2 tablespoons of milk
1 teaspoon vanilla extract

Directions:

  1. Thaw your puff pastry per the directions on the box. I used President’s Choice brand and thawed it on the counter, at room temperature, for about 2 hours.
  2. Preheat the oven to 350F
  3. Line a baking sheet with parchment paper.
  4. Using a mixer, combine the softened cream cheese with 1/4 cup of white sugar. Mix until it’s light and fluffy and happy.
  5. Lay the pastries flat. Divide the cream cheese mixture in half – spread one half down the centre of each pastry (in a strip that’s about 2 inches wide)
  6. Spread pie filling on top of the cream cheese. It’s up to you how much pie filling you decide to use – go nuts or be conservative.
  7. Fold one length of the pastry over top of the filling. Fold the other side of the pastry on top of that. Repeat with the second Kringle. Fold the ends of both Kringles underneath. (I feel like I have made this step very confusing. Have I?)
  8. Brush the tops of both Kringles with the beaten egg (you won’t need the whole thing) and then sprinkle with white sugar. Bonus points if you had some fancy, coarse sugar sitting around for this.
  9. Bake for about 25 minutes – or until everything is nice and browned. I turned mine halfway through to keep things even.
  10. Cool the Kringles for about 15 minutes. While they’re cooling, combine the icing sugar with the 2 tablespoons of milk and the vanilla extract.
  11. Drizzle the extract over the cooled Kringle.
  12. Cut ’em up and eat ’em.

Notes:
Make your own icing sugar by tossing a cup of white sugar into the blender and pulsing until it’s powdery. This stuff tastes WAY better than the icing sugar you buy in the store – did you know they put corn starch in there to keep it from clumping? Ew.

Squash Soup.

Looks wholesome, right?

Looks wholesome, right?

I’ve been on a quest, lately, to try all sorts of food that I hated when I was a kid. I figure now is a good time to inflict that suffering see if my kids enjoy any of it.

Squash is on my list. I’ve never been a fan.

My first surprise was how incredibly difficult it is to peel, and chop, a raw squash. It was awkward and challenging and, eventually, I just handed the squash and the knife to my husband. Friends on Facebook later let me know that I could have roasted it, parboiled, or even microwaved it a bit ahead of time.

For now, I’ll post the recipe as I made it – when I make this again, in the future, I’ll update with the new method(s) I use.

Squash Soup

Makes 4 servings.

Ingredients:
1 buttercup squash (or pretty much any other kind), about 2 pounds
1 large onion, hastily chopped
1/2 teaspoon salt
1/2 teaspoon pepper
2 tablespoons olive oil
2 tablespoon of butter
1 tablespoon olive oil
3 ribs of celery, chopped
1 teaspoon of ground sage
4 cups of chicken stock (no salt added)
1 teaspoon roasted dried ginger powder
parmesan cheese

Directions:

  1. Preheat the oven to 375°F.
  2. Peel the squash while swearing profusely. Cut it in half, scoop out and discard the seeds. Chop the squash into 1 inch chunks.
  3. Combine the squash chunks and the onion in a large bowl. Drizzle on 2 tablespoons of olive oil, 1/2 teaspoon of salt, and 1/2 teaspoon of pepper. Mix it around to coat everything nicely.
  4. Spread the squash and onion onto a foil-lined baking sheet. Put it in the oven and bake it for about 30 minutes or until everything looks lightly browned.
  5. Melt 1 tablespoon of butter and 1 tablespoon of oil in a pot.  Add celery and sage – stir and cook until it’s a little bit softer than it was when you started.
  6. Add the chicken broth and the roasted squash and onion mixture. Bring it all to a boil, stirring, then reduce heat to low and cover. Cooking for another 25 minutes or until vegetables are very soft.
  7. Use your immersion blender to get rid of all the chunks – or put it in a blender (if you’re crazy and don’t fear burning yourself).
  8. Stir in the ground ginger, taste, and add any additional salt and pepper that you’d like.
  9. Serve hot – top each bowl with shredded parmesan cheese. Tell your kids to guess what kind of soup it is.