Cowgirl Candy.

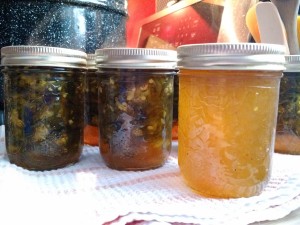
Doesn't look too fancy, right?

Doesn’t look too fancy, right?

There are recipes all over the internet for something called “Cowboy Candy”. This recipe is pretty much the same thing – it’s just that I’m a lady, I’m the one who makes these, and I love these sweet and spicy jalapenos.

So, y’know, that makes them Cowgirl Candy in my books.

Cowgirl Candy is delicious in nachos, on burgers, on their own, with cream cheese on a cracker, on their own, in soups or casseroles, on their own.. you can find plenty of uses for them if you like spicy sweet foods.  It is not actually candy. This will not fool your kids.

This recipe makes approximately 7 (250mL) jars of candy, depending how tightly you pack ’em, and will also leave you with approximately one jar of delicious jalapeno syrup to add to mashed potatoes, swirl into your quinoa bake, or to use as a marinade for meat.  As you can see (sorta’) in the photo, I don’t pack them very tightly – I like each jar to have a bit of extra syrup in there – but that means the peppers will float a bit.

Cowgirl Candy

Ingredients:

3 pounds jalapeno peppers, washed
2 cups cider vinegar
6 cups granulated sugar
½ teaspoons turmeric
½ teaspoons celery seed
3 teaspoons granulated garlic
1 teaspoon ground cayenne pepper

Directions:

  1. I highly recommend that you wear gloves while working with any hot peppers – but I can’t force you to be sensible.
  2. Slice off the stems and tips from all of the peppers. Toss these into your compost bucket.
  3. Slice the peppers into uniform 1/4 inch rounds. I like to use my mandoline because I enjoy taking my life into my own hands around sharp blades. Also, it makes the slices very neat and tidy. But you can totally do this with a knife. Set the pepper slices aside.
  4. In a large pot, combine the cider vinegar, sugar, turmeric, celery seed, granulated garlic, and cayenne pepper. Over medium-high heat, bring this mixture to a boil while stirring.
  5. Reduce the heat and simmer for 5 minutes.
  6. Add the pepper slices and simmer for exactly 4 minutes. For real. Time it. You don’t want them to get mushy and they’re going to get softer later when you process them.
  7. Use a slotted spoon and transfer the peppers into clean jars. Fill to about 1/4 inch line and pack them as tightly as you want them to be.
  8. Turn heat up in the pot and bring the syrup to a full rolling boil. Boil hard for 6 minutes. Time it. For real!
  9. Spoon or pour or ladle the boiling syrup into the jars – covering the pepper slices. Fill each jar to the 1/4 inch line.
  10. If you want to keep a jar or two of syrup, fill those up too!
  11. Wipe the rims of the jars with a damp paper towel – get all the goopy sticky seeds and whatnot off.
  12. Put on your lids and bands. Process for the usual 10-15 minutes (depending on your altitude)
  13. Set aside to cool overnight and look for the happy ping’ed lids that mean everything has sealed up properly. If they haven’t sealed, put the jars in the fridge and eat ’em soon (I recommend nachos.)
Creme Eggs.

20140309_165613

Sweet and tasty!

I am 38 years old and I still love Cadbury Easter Creme Eggs. I am also a huge life-long fan of Laura Secord Easter Eggs. This recipe is basically a combination of the two.

I found the recipe here.

For my own records, here’s how I adapted it slightly (and, below, some notes on what I’d do differently next time).

Creme Eggs

Makes about 15 eggs.

1/2 cup Lyle’s golden syrup
6 tablespoons butter, softened
½ teaspoon salt
1 teaspoon vanilla bean paste
1 teaspoon vanilla
3 cups powdered sugar
small blob of yellow gel food colouring
6 ounces semi-sweet chocolate chips
6 ounces milk chocolate chips

Directions:

  1. Cream together butter, golden syrup, salt, vanilla bean paste, and vanilla extract in stand mixer.
  2. Mix on medium and make sure to scrape down the sides repeatedly.
  3. Turn the mixer to low and slowly add the powdered sugar. Mix until completely smooth, scraping down the sides of the bowl as necessary.
  4. Place 1/4 of the mixture into a small bowl and add enough yellow food coloring gel to obtain your desired color. Cover both bowls with plastic wrap and put into the freezer for at least 15 minutes; your mixture must be very cold while you work with it.
  5. When the sugar mixture is thoroughly chilled, remove from the freezer.  Make small balls out of the yellow mixture. Place them on a bit of parchment paper, on a cookie tray, and put them in the freezer.
  6. Scoop out blobs of your “whites” and roll them into balls.
  7. Remove the yolks from the freezer. Place a white in the palm of your hand and gently flatten it a bit. Press a yolk into the centre and carefully mush the white around to hide the yolk.
  8. Continue this process until all your eggs are complete. Return them to the freezer.
  9. Microwave the chocolate chips in a large bowl  in 30 second intervals, stirring very well in between.
  10. Remove eggs from the freezer and dunk them in the melted chocolate. Place them on parchment paper on a cookie sheet. When they’re all finished, put the tray into the fridge for about 10 minutes to allow the chocolate to set.


Notes:
I adjusted this recipe for ease of use – no toothpicks! my eggs are sorta’ round! If I were making this as a gift for someone, I’d probably try harder to make them look like actual eggs.
Next time, I’ll make them much smaller. I think you could easily make 30 eggs out of this recipe.
Next time, I’ll try using homemade icing sugar (better flavour)
Put the mixtures in the freezer for a few minutes any time it gets a bit soft – it’s much easier to work with when it’s harder.
Lyle’s Golden Syrup is available in my grocery store and at the Bulk Barn.


Guest Post: Abby’s Christmas Crack.

This is a guest post from my delightful friend Abby. She made this recipe for our work holiday drop-in; I am pretty sure that all of it was gone into the bellies of our staff before anyone managed to drop in. It’s called “Christmas Crack” but I feel confident that we could rename it “Violet’s Birthday Crack” or “Monday Crack”. Whatever. Here we go. Let’s start with a photo that Abby stole from the internet..

Mmmm.. Crack!

Mmmm.. Crack!

Christmas Crack

Ingredients:

1 cup butter
1 cup brown sugar (use light probably – dark was kinda weird)
about a half a bag of pretzels (mini ones or square ones are best but in a pinch just rough crush sticks or regular pretzels in your hands)
1 bag chocolate chips (mini work best)
coarse sea salt

Directions:

  1. First and foremost – relax! this is kind of a no-brainer type of recipe so don’t freak out about it. don’t go all A-type or freak-out – just make the damn thing. Maybe have a drink to help with the relaxing (this part is optional but recommended).
  2. Start by lining a medium-size/regular cookie sheet with tinfoil. The thing needs to have sides. Don’t be all Martha Stewart-y and think parchment is better here – it will stick. $.50 dollarstore tin foil will do the job, just make sure it covers the cookie sheet (and up the sides) to make for easy clean-up.
  3. Dump the pretzels onto the cookie sheet and give’r a shake. Aim for about a single layer – roughly half of the bags I buy. But again, refer back to step 1.
  4. Preheat the oven to 350F. Meanwhile, melt the butter and stir in the sugar in a pot. Again, go back to step one. This isn’t rocket science folks. Melt the butter however you want – hi, medium heat – doesn’t matter. Add in the sugar and stir until the butter is fully incorporated. This takes a few minutes but really, just take a breath (or a drink) and it will happen. Keep stirring til it comes to a pretty decent bubble, then turn down the heat to low. Watch the pretty bubbles and stir for about 2 minutes.
  5. Pour the bubbly sugar/butter mixture over the pretzels. You guessed it – refer back to #1. Try to pour it over most of the pan but the stuff will spread out in the oven. Promise.
  6. Pop the pan into the oven for 5 minutes.
  7. Turn off the oven. Pull out the pan – that delicious goo spread out didn’t it? Evenly sprinkle the chocolate chips over the whole bubbly thing. Pop back into the (now off but still hot) oven for a minute-ish to melt the chocolate. Remove from oven – use a spatula to spread out the chocolate. Some of the pretzels might not be fully covered, some might shift – this ain’t a beauty pageant kids. Relax. Sprinkle with coarse sea-salt – however much you want.
  8. Let sit for a few minutes while you clean up (one pot. nice.) and then pop in the freezer for about an hour. Remove from tinfoil and break into piece. Done!

Store in a container in the freezer. Best served if it’s sit out at room temp for a little bit but I’ve been known to grab a piece every time I pass by the freezer. Ain’t no shame.

Looks like a lot of steps but to review: Line a pan. Dump pretzels. Shake. Let butter and sugar make pretty bubbles. Pour. Oven. Chocolate. Oven. Salt. Freezer. BAM.

Sriracha Lollipops.

For the holidays, I bought my husband a package of sriracha-flavoured candy canes. He liked them. He likes sriracha on pretty much everything we eat, so it wasn’t much of a surprise – but he did comment that the flavour wasn’t very strong.  Then I saw this recipe.

I have never made candy before, but I’m trying very hard not to shy away from making new things – even if I have a pretty strong feeling that it won’t turn out or that it’ll be way harder than I expect.

As it happened, I needed my husband to help me make this recipe – specifically because I was freaking out a bit (unnecessarily) and because I felt like I didn’t have enough hands!

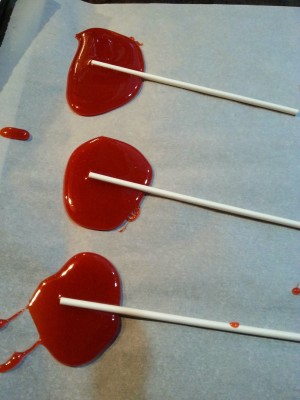
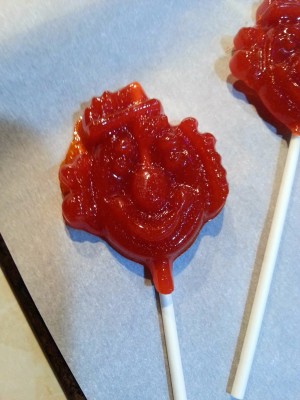
In the end, we learnt some valuable lessons – like “candy sets up pretty fast” and “don’t overfill the molds”. I wouldn’t package these up to give out to people as a gift because they’re a bit messy and wonky, but I would totally make them again and see if I could get them a bit more even next time. We did make a few that were just blobs of candy poured onto parchment paper with sticks added.

Also: sriracha candy is really, really good.  And nowhere near as challenging to make as I expected!

Blobs of candy + sticks!

Blobs of candy + sticks!

Clowns!

Clowns!

I followed this recipe – with only minimal changes. I’m printing the recipe below, with my slight changes (for my own records). If you want to make these, I recommend going to the original site and using those instructions instead.

Sriracha Lollipops!

Makes about 15-20

Ingredients:

2 cups sugar
2/3 cup corn syrup
2/3 cup water
2 tablespoons sriracha sauce, divided
1/2  tsp. orange-coloured gel food colouring

Directions:

  1. Grease a candy mold with cooking spray or cover a cookie sheet with parchment paper.
  2. Combine the sugar, corn syrup, and water in a small saucepan. Put a candy thermometer into the mixture.
  3. Bring the mixture to a boil over medium high heat. Heat without stirring until the bubbling mixture reaches 244°F.
  4. Drop one level tablespoon of sriracha sauce into the bubbling mixture– do not stir! When the mixture reaches the hard crack stage (302-310°F). Remove pan from heat.
  5. Stir in the remaining 1 tbsp. Sriracha sauce and food coloring. Be extra careful because the mixture will bubble and sputter with these additions.
  6. When the mixture has stopped bubbling, pour it into molds and let harden.  Alternately, spoon onto the parchment-covered tray and place a stick in the middle of the blob. Add more candy on top if you want!
  7. Wrap the cooled lollipops in cellophane or wax paper and store in an airtight container.

Notes:

Candy sets up REALLY FAST. Work fast! After everything is done, soak the pot and utensils (and everything else in the kitchen) in really hot water. Scrub. Add more hot water. Scrub again. More hot water. Eventually it’ll all come clean.