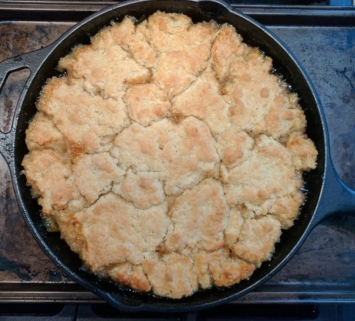
Sweet Rhubarb Upside-Down Cake.

rhubarb_cake

Fresh out of the oven.

I am not a huge fan of rhubarb, but I keep trying. Everyone else seems to like it – in muffins or crumbles or.. whatevers.  This recipe called to me, and I had exactly 1 pound of rhubarb in my fridge, so I made some quick changes and popped this into the oven.

I am now fully in love with rhubarb. Or, at least, this recipe. Be forewarned: it’s really sweet and really tart!

Sweet Rhubarb Upside-Down Cake.

Ingredients:

  • 1 1/2 cups sugar, divided
  • tablespoons unsalted butter (room temperature)
  • 1/2 cup of butter (1 stick) and 6 tablespoons butter, cold.
  • Zest of one lemon + save the juice (you need 1 tablespoon + 2 teaspoons)
  • teaspoons vanilla extract
  • 1/2 teaspoon salt, divided
  • 1 pound rhubarb, trimmed and cut into 1-inch pieces
  • 2 1/2 cups all-purpose flour
  • teaspoons baking powder
  • 1/3 cup whole milk
  • 2eggs, lightly beaten

Directions:

  1. Heat oven to 375° F.
  2. Heat a 10″ cast iron skillet over medium. Add in 1 cup of sugar, 4 tablespoons butter (room temp), lemon zest, lemon juice, vanilla, and 1/4 teaspoon of salt. Stir gently while things melt and get goopy.
  3. When the butter and sugar have melted together, add the rhubarb pieces and cook, stirring occasionally. The rhubarb will give off quite a bit of moisture – that’s okay! Cook until the rhubarb is tender (approx 6 to 8 minutes). Allow to simmer while you complete the next steps.
  4. In a small bowl, whisk together remaining sugar and salt, plus flour and baking powder in a bowl. Add the cold butter, and use your fingers to rub the flour and butter together to form coarse pea-size chunks.
  5. Add milk and eggs and stir until a soft, sticky dough forms.
  6. Turn off the heat underneath the skillet (it’s okay to leave the skillet on the burner, though).  Take pieces of dough and stretch them gently – and place over the hot rhubarb mixture. Try to cover the entire surface. It’s okay for dough chunks to overlap – it’s a bit like making rhubarb cobbler! I ended up using only about 2/3rds of the dough because I wanted a bit less cake – if you’d like a thicker cake, use the full amount.
  7. Put the skillet onto a baking sheet (just in case of overflow!) and put into the centre of the pre-heated oven.  Bake until the cake is golden – for a 2/3rds dough, this will be about 25 minutes. For the full dough recipe, expect between 30 and 35 minutes.
  8. Remove baking sheet and skillet from the oven and let the cake rest for about 10 minutes.
  9. Place a platter or plate on top of the skillet and invert quickly and carefully. The rhubarb will be gooey and sticky on top. Yay!
  10. Serve warm or at room temperature!

Instant Pot Meatloaf.

meatloaf_sliced.jpg

A delicious slice of meatloaf.

During the summer months, my husband will do almost anything to avoid using the oven  (or the stove, actually). Generally this works out in my favour, since he’ll happily head out to the deck and BBQ up some dinner for all of us.  But after picking up my Instant Pots and realizing that they contained heat very well, I started thinking about how easy it would be to cook ‘oven’ foods without heating up the entire house.

Like meatloaf.

Now, there are some challenges with cooking meatloaf in the Instant Pot. First, the very fact that it’s being pressure cooked means there’s no browning of the meat. Second, the glaze won’t get all glaze-y without the oven.  Are these important things? I decided to give it a shot while I was on vacation this week and see what happened.

I used my favourite meatloaf recipe: Thai Turkey Meatloaf from Budget Bytes. (Seriously, it’s the best meatloaf I’ve ever eaten.)  I stuck to the recipe without making any changes to the ingredients – but I did, obviously, make changes to the cooking process.

I have to say – I would happily feed this to my family (it was DELICIOUS) but I’d hesitate to serve it to guests because it really, really doesn’t look great.

Anyway, if you’re feeling like you want to experiment, here’s what I did:

  1. After mixing all the ingredients together, use thick tinfoil to create a ‘pan’ for the meatloaf to sit in while cooking. I made mine round (like the inner IP pot) and about 4 inches tall on the sides.
  2. Put the meatloaf into the ‘pan’ you made and set it on top of the trivet.  Use tinfoil to make a sling, if you need to, unless your trivet has tall enough handles that you can easily pull it out after cooking. (The trivet that comes with the IP is too short to easily grab – so I add a handle onto it with the foil. There are many creative ways to get stuff out of the IP!)

    meatloaf_in-pan

    Homemade ‘pan’ with raw meatloaf in it!

  3. Add 2 cups of water to the bottom of the IP. Place the trivet in, along with the ‘pan’ of meatloaf.
  4. Put the lid on the IP, set it to ‘sealing’, and set it to ‘manual’ for 20 minutes. When the timer finishes, allow for 10 minutes of NR and then QR the remaining pressure.
  5. Check the internal temp of the meatloaf – it should be 165F for ground turkey. If it’s finished, great! If not, put it back into the IP, seal the lid, and do another 5-ish minutes of cooking. QR this time and re-check the internal temp of the meat.
  6. Take the meatloaf out and marvel at how doughy, grey, and unappetizing it looks. This is what happens when you pressure cook meat!
  7. Put the meatloaf onto a baking sheet, cover it in glaze, and put it under the broiler until things are looking better – the glaze should bubble and get sticky, the meat should brown a bit.  This can take anywhere from 5 to 10 minutes, but keep a close eye on it so it doesn’t burn.

    meatloaf_done

    Seriously, this doesn’t look appealing to me.

  8. Remove from the oven, slice it like a cake (?) and serve!  It’s absolutely delicious despite appearances – and the kitchen barely got warm in the process of making it. Win-win!


Cinnamon Raisin Oatmeal Cookies.

oatmeals

So Good. So Many.

My husband loves this recipe because it contains some of his all-time favourite things: cinnamon, raisins, and oatmeal. I like this recipe because it makes at least 5 dozen (or more, if you’re careful about your sizing as you’re putting the dough onto the cookie sheets) and the baking time is short.  Also, I will admit that they’re really good cookies – chewy, soft, but substantial.

The key thing here is to NOT over-bake them.  You will want to bake them longer because they don’t quite look fully cooked when they come out of the oven, but I need you to resist that urge. Resist! They’ll bake a bit more as they’re cooling on the tray. I promise.

Cinnamon Oatmeal Raisin Cookies

Makes about 5 dozen cookies

Ingredients:

  • 1 cup raisins
  • 2 ¼ cups all-purpose flour
  • 1 teaspoon baking soda
  • 1 teaspoon salt
  • 3 tablespoons cinnamon (more/less to taste)
  • 1 cup butter, softened
  • ¾ cup granulated sugar
  • ¾ cup packed brown sugar
  • 1 teaspoon vanilla extract
  • 2 large eggs
  • 2 cups large flake oats (not instant oats)

Directions: 

  1.  Put the raisins in a small pot (ideally with a lid) and cover them with water by about 1 inch. Bring the water to a boil, covered if possible, and let the raisins ‘cook’ for 10 minutes in the boiling water.  When they finish boiling, drain them in a colander and set aside. This step will make the raisins soft and juicy and lovely in the cookies.
  2. Meanwhile, preheat oven to 375° F. Grab a bunch of cookie trays (enough for 5 dozen cookies, if you have enough) and put down parchment paper. (If you don’t have parchment paper, use non-stick trays – don’t grease or spray them.)
  3. In a small bowl, combine flour, baking soda, salt, and cinnamon.
  4. In a larger bowl, beat butter, granulated sugar, brown sugar, and vanilla extract until everything is mixed together and creamy.
  5. While beating, add eggs one at a time. Gradually add in flour mixture.
  6. Check that the raisins are cooled to room temperature – if not, give them a quick rinse under cold water. Drain again.
  7. Stir in the raisins and oats.
  8. Drop by rounded tablespoon onto baking sheets.
  9. Bake for about 8 minutes or until a very light golden brown. The edges will be a bit darker, and if you carefully lift one up you’ll see that the bottom is fully cooked and browned (but still not too dark!)
  10. Cool completely before removing them from the sheets.

Instant Pot Butter Chicken.

butter_chicken.jpg

Butter Chicken!

It’s challenging to take a decent photo of something like Butter Chicken – it’s just sort of.. saucy. But this was definitely a delicious dinner and it turned out even better than I had hoped.  Easy-peasy, too.

I’m not going to include a recipe for rice here – I used jasmine rice and I made it in my 2nd Instant Pot. You could easily use leftover rice (the sauce from the Butter Chicken will help warm it up!) or you could make it on your stovetop – – or in your second Instant Pot, if you have one.

Here’s the recipe:

Butter Chicken

Ingredients:

  • About 3 pounds of boneless skinless chicken thighs
  • 1 can (28 oz) diced tomatoes in juice
  • 1 jalapeno pepper, seeded
  • 1 inch fresh ginger, grated
  • 3/4 cup butter
  • 2 1/2 teaspoons ground cumin
  • 1 1/2 tablespoon paprika
  • 2 1/2 teaspoons kosher salt
  • 1 cup heavy cream
  • 1 cup plan Greek yogurt
  • 2 1/2 teaspoons garam masala
  • 3 tablespoons cornstarch

Directions:

  1. Cut chicken into bite sized pieces. Discard any excess fat.
  2. Into your blender, add the can of tomatoes (including the juice), the grated ginger, and the jalapeno. Blend until there are no chunks remaining.
  3. Add butter to your Instant Pot and use the saute function to melt it thoroughly.
  4. Add chicken in small batches (2 or 3 batches). Brown lightly on all sides. Use a slotted spoon to remove each batch and place into a bowl. You want to save any juices that come from the sauteed chicken.
  5. When you’re finished lightly browning the chicken, and all has been removed, add the cumin and paprika to the butter that remains in the pot. Stir well, until all spices are mixed into the butter. (Act fast, or it will burn!)
  6. Add in the tomato mixture, salt, cream, and yogurt. Stir quickly, then add the chicken and any drippings from the bowl. Stir again.
  7. Close the lid and set to manual pressure for 5 minutes.
  8. When the timer goes off, allow it to natural release for 10 minutes. After 10 minutes, do a quick release of any remaining pressure.
  9. In a small bowl, combine about 4 Tablespoons of water with the cornstarch. Mix really well.
  10. Stir the cornstarch into the pot. Add the garam masala.
  11. Using the saute button, bring everything to a boil and allow the curry to thicken to your liking. Add any salt, pepper, or other spices that your heart desires.
  12. Serve over rice. Nom.

Instant Pot Sushi Rice + Maki.

sushi

Oh, hello! It has been a while since I have written here – for many reasons, not the least of which was a full kitchen renovation – literally down to the studs in some places, a wall removed, new everything added..  I could have done some fantastic posts here about frozen microwaveable meals, I suppose, but.. honestly, I mostly just want to forget all about that.

Shortly before my kitchen renovation, I purchased one of those fancy-schmancy Instant Pots that all the kids are talking about. And, shortly after that, I purchased a second one. You can expect to see many IP posts here now that I’m back to writing – because there’s a good reason that everyone loves this appliance.

First up, today’s dinner: maki!  I love sushi rice so much that I am perfectly happy to eat it on its own – so the idea of making it easily at home is delightful. Here we go!

Maki

Makes approximately 6 large rolls (with a lot of rice in them!)

Ingredients

  • 2 cups jasmine rice
  • 2 1/2 cups water
  • 1/2 cup rice vinegar
  • 1 tablespoon white sugar
  • 1/2 teaspoon sea salt
  • package of nori (seaweed sheets – toasted or non-toasted are both fine)
  • your preferred fillings, for example: shredded carrots, sliced cucumbers, crab meat + mayo + sriracha sauce, avocado, green onion.

Instructions

  1. Rinse the rice under cold water. Shake out any excess water and put the rice into the Instant Pot pot.
  2. In a separate bowl, whisk water, rice vinegar, sugar, and sea salt. As soon as the sugar and salt have dissolved, pour the liquid over rice in the Instant Pot. Stir well.
  3. Put the lid on the Instant Pot, set the vent to “sealing”. Use the “rice” setting – no need to adjust the time. Let the Instant Pot do its thing!
  4. While the rice is cooking, chop up your delicious fillings. Long, thin slices are ideal – but do whatever makes you happy.
  5. When the rice is finished, allow for a 5 minute natural release – after that, open the vent up and let the rest of the pressure out.
  6. Do not stir the rice – just dump it out onto a wooden cutting board. Use a spoon to spread the rice out and allow it to cool enough to touch.
  7. Set a sheet of nori out on your counter – I used a piece of parchment paper – and spoon a layer of rice on top. Use the back of a spoon, or slightly damp fingers, to smooth the rice out to cover most of the sheet. Leave a strip about 1/2 an inch wide for sealing the roll.
  8. Across the middle of the rice, add your toppings. Use as much, or as little, as you like.
  9. Roll the nori up towards the empty 1/2 inch. Use a bit of water on your fingers to seal the seaweed up.
  10. After a few minutes, slice the roll into reasonable-sized chunks.  Eat! Enjoy!